Part 3 - Create your own Metadata Views
This is the 3rd part of a series of articles to improve your import workflow with Apple Aperture. After we achieved organizing libraries and created a library structure, we need to optimize our metadata tools. Getting the use of metadata right, will not only improve your import workflow, but will also assist you in the future with finding specific images in Aperture.
Metadata, allows you to attach information to your images, like time and date of capture, copyright, keywords etc. Some information is automatically attached to your image by your camera (exposure time, time and date of exposure etc.). You can other data manually. Adding keywords to thousands of images manually would be a harsh punishment and contradict what I believe in. Luckily, you can add the same metadata to more than one image at a time with Aperture and you can also automate the process to a certain extent. Creating your own metadata view is the first step.
Automation works great when you have to add the same kind of metadata to your images again and again. If you want to assign a copyright notice to all your images, you can work with metadata presets in Aperture. Once more, you have to work hard in preparing the presets, but the rewards are so sweet that you will actually enjoy the process.
Think about what kind of images, you work with on a regular basis: Are you mostly shooting weddings, portraits, cars, landscape or children? Whichever field you work in, adjusting your metadata to your needs will reward you with an import workflow which makes you so much more efficient and allows you to do the things you rather would be doing, like installing Leopard on your Mac. :)
In case you want to learn more about metadata, Wikipedia offers some interesting articles:
Metadata
EXIF
IPTC
These articles will supply with far more information that you need to work with Aperture.
It’s time to get to work. Open Aperture, go into any of your projects or albums and select a random image. Ctrl D will open the Metadata side-panel.
On top you see a drop-down menu called Metadata View. Select All IPTC. Your side-panel extends to a very long list of empty fields. If you choose EXIF - Expanded, you see a list with camera related data.
Go through the metadata views and look for a view your really like. Keep in mind that changing the view does not change the data assigned to the images. A view just filters what you see. Make a note of your favorite view. You will need it in the next step.
Let’s create our own view. Next to the Metadata View drop-down menu, you find a star with another drop-down menu. Click on it and select Manage Views. Yes, there is an option for New View, but that would build a view from scratch. We want to save on our workload... After opening Manage Views, you see a list of all existing Metadata Views. Select your favorite. I selected IPTC - Basic. Then click on the + sign on the bottom of the screen. A copy of your selected view is created. Give it an easy to remember name. I called mine Import Standard. Click OK. Now select your freshly created metadata view in the Metadata View drop-down menu. To add an extra field to your view, go to the bottom of the side-panel and select IPTC. A new list from the bottom up appears. Make sure to unselect Hide Empty Tags on top of that list.
Adding a new field to your custom view is as easy as ticking the box next the field name. In my case, I decided to select City and Country Name.
Your Metadata View is automatically saved. You don’t need to do anything else. Congratulations, you just created your first personalized Metadata View.
Tomorrow, we will create our own presets after creating some personalized keyword settings.
That's, where things become interesting and we will be ready to import our first project.
Yesterday, I got a bit carried away and announced writing about keyword settings for today’s entry. Please forgive me for that.
06 November 2007
05 November 2007
Improve your Workflow with Aperture Part 2
Part 2 Get the most out of your folder structure
Right out of the box, Aperture helps you to upload your images from your camera into the application fast . With a little bit of planning and preparation, you can make this one of the most effective ways to organize your images for the long run and have the images organized right from the beginning.
I love automating things and let the computer work for me and not vice versa. It takes some time to create the setup, but once you accomplished this, you will save time every time, you upload your images.
This is the second article in this small series on improving your import work-flow in Aperture.
Yesterday, I presented the concept of working with different libraries in Aperture. Now let’s start up Aperture and have a look inside. Aperture organizes images in Projects, Albums, Yellow Folders and Blue Folders.
There are some key-points to keep in mind, when organizing your folder structure:
I like starting my folder structure the same away across different libraries. It keeps things tidy and organized.
 My folder structure would look like this and you might prefer working in a different structure. You need to find, what works for you. Check this example Folder Structure. If you have a lot of customers per month you can insert a folder for each month after Customers.
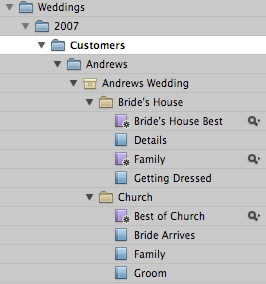
The 2007 Folder is the main Folder, Customers, the first level folder, which contains the folders for my clients. Within the Andrews Folder, you see the project called Andrews Wedding for this event. This is where I direct Aperture to import my images.
Under the Project Andrews Wedding, I inserted a folder called Bride’s House. Within this folder, you find Albums called Details, Family, etc. After the import I cold move the corresponding images into these folders.
With another step of preparation, during import, I can automate this by using Smart Albums. Smart Albums allow you to include images automatically, which posses certain characteristics, like ratings, date and metadata like keywords. By assigning the right keywords when you import, you will have your albums populated automatically. In this case, I chose Bride’s House and Family. Magic! All images with these two keywords show up in the Smart Album Family within the folder Bride's House.
To add a Smart Album, mark the folder, where you want to add the Smart Album and either select via the File Menu, New Smart Folder or use the keyboard shortcut: Shift Command L
Just make sure to tick Match all of the following: in the Smart Albums settings.
Check this screenshot, where I activated a smart folder for the events at the Bride’s House for Family. The category Keywords is not part of the standard
 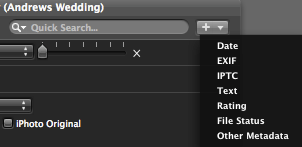 conditions for Smart Folders.
You can activate it by clicking on the + on the right hand side and selecting IPTC. In the available dropdown menu, you can choose the required IPTC field you are looking for.
I also included in each yellow folder another smart folder called Best of This helps me, when I want to work with my preselection of my images in each category.
Play around with the different options and maybe import some images into a test folder and see what works for you. Having a structure like this in place, before I even go out to take the pictures, helps me to cover all the aspects of the wedding and work more systematically even at taking the pictures for my clients.
One more trick, if you only want to see folders of one customer, you can mark this customer's folder as favourite, by clicking on top of your Project Panel by selecting Add to favorites in the dropdown menu. Next to All Projects, you see a small triangle, which reveals another dropdown menu, where you can choose Show Favorites. That excludes all other albums and might be useful during presentation to your customers or helping you go focus on your current project.
Tomorrow, I will move deeper into the use and organization of keywords.
Right out of the box, Aperture helps you to upload your images from your camera into the application fast . With a little bit of planning and preparation, you can make this one of the most effective ways to organize your images for the long run and have the images organized right from the beginning.
I love automating things and let the computer work for me and not vice versa. It takes some time to create the setup, but once you accomplished this, you will save time every time, you upload your images.
This is the second article in this small series on improving your import work-flow in Aperture.
Yesterday, I presented the concept of working with different libraries in Aperture. Now let’s start up Aperture and have a look inside. Aperture organizes images in Projects, Albums, Yellow Folders and Blue Folders.
There are some key-points to keep in mind, when organizing your folder structure:
- The color of folders is automatically assigned.
- Blue folders contain Projects.
- Yellow Folders are contained in a Project.
- Folders can’t hold images alone. Images reside in Projects or Albums.
I like starting my folder structure the same away across different libraries. It keeps things tidy and organized.
 My folder structure would look like this and you might prefer working in a different structure. You need to find, what works for you. Check this example Folder Structure. If you have a lot of customers per month you can insert a folder for each month after Customers.
The 2007 Folder is the main Folder, Customers, the first level folder, which contains the folders for my clients. Within the Andrews Folder, you see the project called Andrews Wedding for this event. This is where I direct Aperture to import my images.
Under the Project Andrews Wedding, I inserted a folder called Bride’s House. Within this folder, you find Albums called Details, Family, etc. After the import I cold move the corresponding images into these folders.
With another step of preparation, during import, I can automate this by using Smart Albums. Smart Albums allow you to include images automatically, which posses certain characteristics, like ratings, date and metadata like keywords. By assigning the right keywords when you import, you will have your albums populated automatically. In this case, I chose Bride’s House and Family. Magic! All images with these two keywords show up in the Smart Album Family within the folder Bride's House.
To add a Smart Album, mark the folder, where you want to add the Smart Album and either select via the File Menu, New Smart Folder or use the keyboard shortcut: Shift Command L
Just make sure to tick Match all of the following: in the Smart Albums settings.
Check this screenshot, where I activated a smart folder for the events at the Bride’s House for Family.
 The category Keywords is not part of the standard
  conditions for Smart Folders.
You can activate it by clicking on the + on the right hand side and selecting IPTC. In the available dropdown menu, you can choose the required IPTC field you are looking for.
I also included in each yellow folder another smart folder called Best of This helps me, when I want to work with my preselection of my images in each category.
Play around with the different options and maybe import some images into a test folder and see what works for you. Having a structure like this in place, before I even go out to take the pictures, helps me to cover all the aspects of the wedding and work more systematically even at taking the pictures for my clients.
One more trick, if you only want to see folders of one customer, you can mark this customer's folder as favourite, by clicking
 on top of your Project Panel by selecting Add to favorites in the dropdown menu. Next to All Projects, you see a small triangle, which reveals another dropdown menu, where you can choose Show Favorites. That excludes all other albums and might be useful during presentation to your customers or helping you go focus on your current project.
Tomorrow, I will move deeper into the use and organization of keywords.
04 November 2007
Improve your Workflow with Aperture - Part 1
Part 1 Optimize Libraries
Right out of the box, Aperture helps you to upload your images from your camera into the application fast . With a little bit of planning and preparation, you can make this one of the most effective ways to organize your images for the long run and have the images organized right from the beginning.
I love automating things and let the computer work for me and not vice versa. It takes some time to create the setup, but once you accomplished this, you will save time every time, you upload your images.
This is the first article in a small series on maximizing your workflow with Aperture.
First of all, you need to decide, if you work with only with one library or different libraries. Why would you want to work with more than one library? Earlier this year, I discovered that Aperture slowed down to an unacceptable slow speed. Concerned that my MacBook Pro would be the source of the problem, I visited my favorite Apple Store. Luckily, one of the sales people works on weekends as wedding photographer and understood my challenge. He pointed out to me that I probably don’t need to have access to my private images from 2005 all the time and recommended to create separate libraries for personal images and my professional work.
I applied his advice and created different libraries for my images. Now, I have one library for the current year with private images and for every quarter of the year a separate library for my professional work.
If your library is not that big and you don’t upload images every day this might not be necessary for you. Keep in mind that this strategy also helps for backing up your data. Let’s say, you have a library for your clients for January to March, you can simply back up the complete library on an external hard-drive without much worry.
Follow these steps to create a new empty library:
To open a different library, you have two options:
In the next article, you will learn on how to work with different folder structures in Aperture.
Right out of the box, Aperture helps you to upload your images from your camera into the application fast . With a little bit of planning and preparation, you can make this one of the most effective ways to organize your images for the long run and have the images organized right from the beginning.
I love automating things and let the computer work for me and not vice versa. It takes some time to create the setup, but once you accomplished this, you will save time every time, you upload your images.
This is the first article in a small series on maximizing your workflow with Aperture.
- Optimize Libraries
- Optimize your folder structure
- Personalize and structure your Keyword List
- Create your own Metadata Presets
- Autostacking
First of all, you need to decide, if you work with only with one library or different libraries. Why would you want to work with more than one library? Earlier this year, I discovered that Aperture slowed down to an unacceptable slow speed. Concerned that my MacBook Pro would be the source of the problem, I visited my favorite Apple Store. Luckily, one of the sales people works on weekends as wedding photographer and understood my challenge. He pointed out to me that I probably don’t need to have access to my private images from 2005 all the time and recommended to create separate libraries for personal images and my professional work.
I applied his advice and created different libraries for my images. Now, I have one library for the current year with private images and for every quarter of the year a separate library for my professional work.
If your library is not that big and you don’t upload images every day this might not be necessary for you. Keep in mind that this strategy also helps for backing up your data. Let’s say, you have a library for your clients for January to March, you can simply back up the complete library on an external hard-drive without much worry.
Follow these steps to create a new empty library:
- If you haven’t done so, start Aperture, go to Preferences (Keyboard Shortcut: Command ,). Right on top, under Library Location, select Choose. Create a folder for your new empty Library on your internal or external hard-drive. Apple recommends for best performance to use your internal hard-drive. This depends on how you work. I work currently with referenced files. My Aperture library on my Mac contains the previews and all but the most current Master Files are saved on an external hard-drive.

- After you created your folder, click on Select
- Close Aperture
- When you navigate to your new library, you have the option to rename the library or keep them in different folders.
- Navigate to your new library and double click to start Aperture and your new empty Aperture library presents itself to you.

To open a different library, you have two options:
- either navigate to the folder where the library resides to start Aperture from there or
- you select a different library within Aperture’s Preferences. You need to restart Aperture in order to open this library.
In the next article, you will learn on how to work with different folder structures in Aperture.
03 November 2007
Image: Seapoint Cape Town

A few weeks ago, my wife went for a walk in the afternoon along Seapoint and I was able to capture this image. BW conversion via Aperture.
Google Custom Search
I planned to do this for a while. Today, I finally got it done. On the top left side of this page, you find now two search boxes. One search box offers a search for this site only. You might remember that you saw something here that you want to read again. Enter your query and Google delivers.
The second search box extends the search to external photo related blogs, which I am currently subscribed to. Currently, 28 blogs are included, but this number will grow soon to give you the best possible resource on photo related queries.
If you have any suggestions for sites to be included, put them in as a comment.
Subscribe to:
Posts (Atom)