13 November 2007

How I work with Stacks and Ratings

Aperture offers two distinct ways of identifying the selects of your photo shoots. Stacking and star ratings are two different ways of approaching the challenge and you might want to use them as a combined tool

What does stacking do? Stacking combines different images into one stack of images, where only the top one is used. Imagine a stack of slide put on top of each other on a lightbox. You can either combine the images by autostacking them as described here, or by selecting them manually. For most situations, I do the initial stacking via auto stacking and add some other images manually to that stack. I might even combine two different stacks into one.

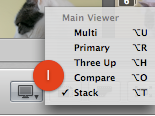
The images are now sitting in one stack, but how do I make my selection? On the bottom of your Aperture screen, select the Stack Mode (1) or simply click alt T
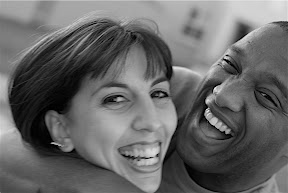
Open your stacks by clicking alt ' or select the function via Menu Stacks. Your images are presented similar to this screenshot of a world famous model :-) The left image presents the current pick and the right image a picture of the stack to compare it to.
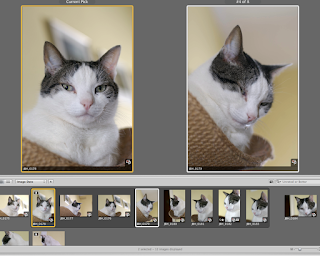
Don't work via the menu to select your picks. It takes far too long. If you want to select the right image as the new pick, use the keyboard shortcut Apple \ and immediately the image will move to the left and a new image from the stack replaces the old comparison image. If the new image is not better than the current pick, click the right arrow button to move to the next image in the stack. The description takes far longer than the process itself.

Reducing the initial amount of images to stacks reduces a lot of clutter in your project. After you selected your picks and closed all stacks, you will only see the picks of each stack.

Another way of coming to a similar result, is by working in the normal Multi View and give your images star ratings from 1 to 5 and Rejects. How do you give your images a star rating? Simply click a number on your keyboard and the according star rating will be applied to the image. If you click 9, the image will be marked as Reject and hidden from the default view.

This is another effective way of moving through your images to view the best results. I tend to use only ratings between 3 and 5 and Rejects (for technically faulty images). When I filter my project by star ratings and only want to see the best images, I use the keyboard shortcut ctrl 5 to view all images with a 5 star rating only.

Alternatively make your selection in the filter dropdown menu.

You can combine both methods by first working with stacks and then applying star ratings. This can be useful for a portrait session, where you select the best image of each pose first and then select the best pose for your client via star rating.

12 November 2007

Strobist Ring Flash

If you are serious about learning more about flash photography, then Strobist is the Blog to read. This week, you will learn about ring flash photography.
Ring flashes are popular with fashion photographers as they provide a good quality light. Ring flashes are expensive. Strobists will provide a diy manual for a speedlight based ring flash.
Check it out. It is a great resource.

11 November 2007

Feed Settings

I noticed that my feed settings were setup incorrectly. When you subscribed to the feed, you were only able to see the heading of my posts. You should now see the intro of the post.

Let me know if you have problems reading the feed in your feedreader.

Have a great weekend!

09 November 2007

How to work with Auto-Stacking and Stacks in Aperture

I covered working with auto-stacking only briefly in Part 4 of the series of Optimizing your Aperture Import Workflow. Auto-stacking is one of these small tools, which are sometimes overlooked, but very useful.

How does it work? Aperture assumes that images, which were shot in short succession, are very similar and can be stacked together. As a result, you have one favorite, which is on top of the stack you work with. Similar shots of the series are hidden below the favorite. You can open stacks and rearrange them very quickly. Stacking and auto-stacking helps you stayed organized and make clear and fast decision on which picture is great and which is not.

When you read Aperture's manual you might have the impression that you only can use auto-stacking when you import images. This is not the case and I will show you later, how it works.

As an example, you want to import images from your holiday. There are some shots from a picknick at the beach, which you want to import. You worked creative that day and tried different settings on your camera and did several snapshots of your friends and family.

On the bottom of your screen, you find this slider. When the slider is on 0:00 as in the screenshot, auto-stacking is disabled. When you move to the right, you activate auto-stacking and Aperture immediately stacks images together. Let's say, you moved the slider to 0:15, then Aperture combines all images taken within 15 seconds increments together into one stack. You can move the slider to the left and to the right until you see that most of your images are stacked together the way you want it. Sometimes the stacks are combined perfectly, most times you need to do some small manual adjustments.


You can do these adjustments either now or later after the import. Why wait, if you can make your life easier right away. To combine two stacks or more with each other or add another single image to an existing stack, mark all images you want to have in one stack. Click either Apple K or go to Stacks - Stack.

If you want to move one or more images out of a stack, click Shift alt K or select Stacks - Extract Item. If you would choose Unstack, all images in the stack would be moved out of the stack.

I assume you did your keyword magic and created a personalized Metadata Preset. Click import and your images will be imported into your Project Folder.

When you view your images, you have the choice to view all images in the stack or the favourite image only. To view all images, click alt ' to open all stacks or go to Stacks - Open All Stacks. Alternatively, you close all stack s by clicking alt ; or by selecting Stacks - Close All Stacks.

When the stacks are closed, you find a small number displayed in the left top corner of the preview image. This number (8 in the screenshot) indicates the amount of images in the stack.


If you forgot to use auto-stacking when you imported the images, but would love to organize them quickly into stacks, you can do that. Go to the Project Folder, and select the images, you want to stack. Click alt Apple A or select Stacks - Auto-Stack. A small HUD with the slider will pop up and you can adjust it to your needs.

Tip: Change the layout of your screen to Maximise Browser (alt Apple B or Window - Layouts - Maximise Browser) as you want to concentrate on how the stacks are packed. To return to the normal layout, click alt Apple S or select Window - Layouts - Basic.

After the weekend, I will return on some more details on working with stacks.

08 November 2007

Optimizing your Aperture Import Workflow - Part 5

Adjustments

Reading through my entries, I realized that you might want to see some more screenshots to illustrate my points and make things easier to understand. I will go through the posts over the weekend and upload some screenshots.

Remember that using the presented steps will help you becoming more effective with your import into Aperture for the long run, especially when you have to work with a lot of keywords. The initial setup can be time consuming, especially organizing the keywords.

I went through my keywords yesterday and started reorganizing them by exporting them into a text editor. This seems to work faster than working in Aperture directly. When you have a keyword more than once in your keyword list, make sure to select the correct keyword for the filter in the Smart Folder. Aperture appears to be stubborn, when it comes to that.

Some users prefer using Stacks in Aperture to organize and sort their images, others use the star rating system to stay organized. You need to see what works best for your circumstances and photo shoots. It is a theme, I will cover stacking and organizing images in Aperture soon.

07 November 2007

Optimizing your Aperture Import Workflow - Part 4

This is the 4th part of a series of articles to improve your import workflow with Apple Aperture. After we achieved organizing libraries and created a library structure and successfully creating our personalized Metadata View, it’s time to have a closer look into keywords and adding one more detail to working with Metadata.
Aperture offers you a lot of flexibility in managing your own keywords. Aperture comes with some predefined keywords and keyword groups. It would be great if the predefined lists would be bigger, especially when you are working with stock libraries.

So, it takes a bit more of work from our side to get the results we need from Aperture. Aperture uses frequently HUDs (heads-up displays). These are semi-transparent pop up windows, which let you perform different tasks. As we are dealing today with keywords, let’s open the keyword HUD by using the keyboard shortcut Shift h. A more or less long list appears on your screen with keywords. You could just go ahead and add your own keywords. That can become messy. There is a better way.

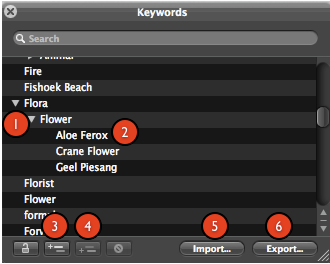
Next to some keywords, you will notice a small triangle (1 in screenshot). Clicking on it, reveals subcategory keywords to the main keyword. These are keyword groups (2). You can also create subcategories of the subcategories, similar to the folder structures, we created on the second day of this series. Click (3) to create a new group or subcategory and (4) to add a new keyword.


My first piece of advice for today is to keep your keywords organized. Create main categories and add related keywords to it. Also, create subcategories! It will make your life so much easier for the future!
Secondly, start each new keyword with a capital letter and thirdly check your spelling. You can correct spelling mistakes later, but keep things as organized and correct as possible right from the beginning.

You can check, if you prefer working in a text editor with your keywords, by exporting the keyword list (by clicking Export (5) on the bottom of the HUD) and opening it with your preferred text editor. For importing the newly edited list, you simply use the Import button (6).
When you work with a text editor, you create subcategories by using a tab as in this example:
Family
Outdoors
Indoors
Create some useful keywords for your workflow, import them into your keyword tool and close the keyword HUD.

There is another way of working with keywords and assigning keyboard shortcuts, but that is more useful, when working with already imported images. I will cover this in a blog entry at a later stage.

Click Ctrl D to open the Metadata View side-panel. Select your personalized Metadata View, you created yesterday. Now we get to the exciting part of the import preparations.


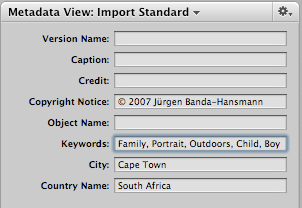
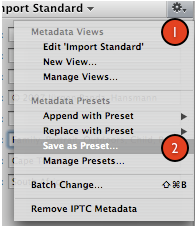
I do a lot of children and family photography and created an according keyword list. To make the whole thing work you need to select an image. Go to the Keywords field in your Metadata View (if you don’t have it, you need to add it as described yesterday.) You might see some keywords in there. Cut and paste them into a text editor. Enter the keywords for a Metadata Preset, you will use often. I enter: Family, Portrait, Outdoors, Child, Boy. In the field City, I enter Cape Town and for Country, South Africa. I also enter a copyright notice under Copyright Notice. (you can type the © sign by using alt g). Now I click on the star drop-down menu on the right hand side top and select: Save as Preset. Select a appropriate name and create as many presets as you want. After you finished, copy the original keywords back from the text editor to restore the image information.


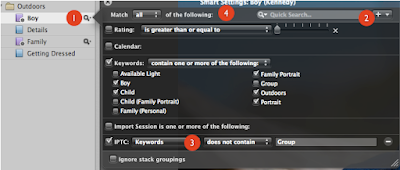
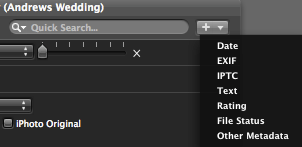
Now it is time to revisit your Smart Folders. Edit your smart folder by clicking on the loupe sign with the arrow (1 in the screenshot). If you haven’t done so, add Keywords as one selection category. (By using the drop down menu next to the + sign on the top right hand side of the HUD. (2) Click on IPTC. A new IPTC category is added. Just go to that drop down menu and choose Keywords. You can also use a second set of Keywords (3) for keywords you want to exclude.) You will see a list of keywords, which you simply select by clicking the box next to it. Use contain all of the following next to Keywords.(4)


If you have some images on your camera, you can go and import them now by connecting the camera or the card reader to your Mac. If you want to give it a test run, select some images for the import from your local hard drive, You can delete them afterwards.

Aperture opens the preview window with the image thumbnails. Let’s do some magic! Select some images, where you want to attach the same metadata from one of your presets. Go to the right hand side panel and go to Add Metadata From: "Your Metadata View Preset" and select Replace.

Repeat these steps until you did that for all your images with the corresponding presets. If you set up your smart albums correctly, they will be populated with the images you selected.

Optionally, you can choose to work with auto-stacking. To use this tool go to the bottom of the screen and move the slide from the left to the right until you see that your images are mostly grouped correctly. Moving the slider to the right increases the tolerance of the filter. If a few images are stacked together incorrectly, don’t worry about it now. Just extract them after the import from the stack and put them into the right stack manually.

Tomorrow, I will round up this series by covering some details and help you fine tuning the system. If you have any questions or you find that I was unclear in my explanation, please leave a comment and I will follow up.

Official Google Reader Blog: Attack of the 20%'ers

My first post today is a link to new feature for Google Reader. If you are a blogger or blog reader these might be interesting to you.

Official Google Reader Blog: Attack of the 20%'ers

Steve Lacey and Dolapo Falola announced news features for Google Reader today: You can share directly from Google Reader settings your reading list with your blog. It is an elegant way of keeping your blogroll on your blog updated. What I also like, is the fact that you can select specific tags, which you use for your blogroll.
I integrated my Photography Blogroll on the bottom right hand side of this page. Very useful!!

Dolapo Falola talks about updates for the mobile Google Reader for your cellphone, especially but not only for the iPhone.

I would assume that the iPhone is a favourite gadget with Google engineers.

06 November 2007

Improve your Workflow with Aperture Part 3

Part 3 - Create your own Metadata Views

This is the 3rd part of a series of articles to improve your import workflow with Apple Aperture. After we achieved organizing libraries and created a library structure, we need to optimize our metadata tools. Getting the use of metadata right, will not only improve your import workflow, but will also assist you in the future with finding specific images in Aperture.

Metadata, allows you to attach information to your images, like time and date of capture, copyright, keywords etc. Some information is automatically attached to your image by your camera (exposure time, time and date of exposure etc.). You can other data manually. Adding keywords to thousands of images manually would be a harsh punishment and contradict what I believe in. Luckily, you can add the same metadata to more than one image at a time with Aperture and you can also automate the process to a certain extent. Creating your own metadata view is the first step.

Automation works great when you have to add the same kind of metadata to your images again and again. If you want to assign a copyright notice to all your images, you can work with metadata presets in Aperture. Once more, you have to work hard in preparing the presets, but the rewards are so sweet that you will actually enjoy the process.

Think about what kind of images, you work with on a regular basis: Are you mostly shooting weddings, portraits, cars, landscape or children? Whichever field you work in, adjusting your metadata to your needs will reward you with an import workflow which makes you so much more efficient and allows you to do the things you rather would be doing, like installing Leopard on your Mac. :)

In case you want to learn more about metadata, Wikipedia offers some interesting articles:

Metadata
EXIF
IPTC

These articles will supply with far more information that you need to work with Aperture.

It’s time to get to work. Open Aperture, go into any of your projects or albums and select a random image. Ctrl D will open the Metadata side-panel.

On top you see a drop-down menu called Metadata View. Select All IPTC. Your side-panel extends to a very long list of empty fields. If you choose EXIF - Expanded, you see a list with camera related data.

Go through the metadata views and look for a view your really like. Keep in mind that changing the view does not change the data assigned to the images. A view just filters what you see. Make a note of your favorite view. You will need it in the next step.

Let’s create our own view. Next to the Metadata View drop-down menu, you find a star with another drop-down menu. Click on it and select Manage Views. Yes, there is an option for New View, but that would build a view from scratch. We want to save on our workload... After opening Manage Views, you see a list of all existing Metadata Views. Select your favorite. I selected IPTC - Basic. Then click on the + sign on the bottom of the screen. A copy of your selected view is created. Give it an easy to remember name. I called mine Import Standard. Click OK. Now select your freshly created metadata view in the Metadata View drop-down menu. To add an extra field to your view, go to the bottom of the side-panel and select IPTC. A new list from the bottom up appears. Make sure to unselect Hide Empty Tags on top of that list.

Adding a new field to your custom view is as easy as ticking the box next the field name. In my case, I decided to select City and Country Name.

Your Metadata View is automatically saved. You don’t need to do anything else. Congratulations, you just created your first personalized Metadata View.

Tomorrow, we will create our own presets after creating some personalized keyword settings.
That's, where things become interesting and we will be ready to import our first project.

Yesterday, I got a bit carried away and announced writing about keyword settings for today’s entry. Please forgive me for that.

05 November 2007

Improve your Workflow with Aperture Part 2

Part 2 Get the most out of your folder structure

Right out of the box, Aperture helps you to upload your images from your camera into the application fast . With a little bit of planning and preparation, you can make this one of the most effective ways to organize your images for the long run and have the images organized right from the beginning.

I love automating things and let the computer work for me and not vice versa. It takes some time to create the setup, but once you accomplished this, you will save time every time, you upload your images.

This is the second article in this small series on improving your import work-flow in Aperture.
Yesterday, I presented the concept of working with different libraries in Aperture. Now let’s start up Aperture and have a look inside. Aperture organizes images in Projects, Albums, Yellow Folders and Blue Folders.

There are some key-points to keep in mind, when organizing your folder structure:
  1. The color of folders is automatically assigned.
    1. Blue folders contain Projects.
    1. Yellow Folders are contained in a Project.
  2. Folders can’t hold images alone. Images reside in Projects or Albums.
This might all sound confusing, so let’s have a look at an example. In our scenario, we are working on a Folder Structure for a Wedding Photographer.
I like starting my folder structure the same away across different libraries. It keeps things tidy and organized.

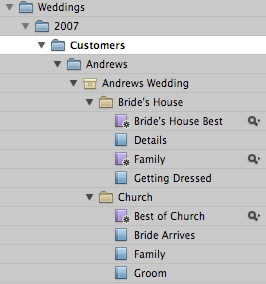
My folder structure would look like this and you might prefer working in a different structure. You need to find, what works for you. Check this example Folder Structure. If you have a lot of customers per month you can insert a folder for each month after Customers.

The 2007 Folder is the main Folder, Customers, the first level folder, which contains the folders for my clients. Within the Andrews Folder, you see the project called Andrews Wedding for this event. This is where I direct Aperture to import my images.

Under the Project Andrews Wedding, I inserted a folder called Bride’s House. Within this folder, you find Albums called Details, Family, etc. After the import I cold move the corresponding images into these folders.

With another step of preparation, during import, I can automate this by using Smart Albums. Smart Albums allow you to include images automatically, which posses certain characteristics, like ratings, date and metadata like keywords. By assigning the right keywords when you import, you will have your albums populated automatically. In this case, I chose Bride’s House and Family. Magic! All images with these two keywords show up in the Smart Album Family within the folder Bride's House.

To add a Smart Album, mark the folder, where you want to add the Smart Album and either select via the File Menu, New Smart Folder or use the keyboard shortcut: Shift Command L
Just make sure to tick Match all of the following: in the Smart Albums settings.

Check this screenshot, where I activated a smart folder for the events at the Bride’s House for Family.The category Keywords is not part of the standard conditions for Smart Folders.
You can activate it by clicking on the + on the right hand side and selecting IPTC. In the available dropdown menu, you can choose the required IPTC field you are looking for.

I also included in each yellow folder another smart folder called Best of This helps me, when I want to work with my preselection of my images in each category.

Play around with the different options and maybe import some images into a test folder and see what works for you. Having a structure like this in place, before I even go out to take the pictures, helps me to cover all the aspects of the wedding and work more systematically even at taking the pictures for my clients.

One more trick, if you only want to see folders of one customer, you can mark this customer's folder as favourite, by clicking on top of your Project Panel by selecting Add to favorites in the dropdown menu. Next to All Projects, you see a small triangle, which reveals another dropdown menu, where you can choose Show Favorites. That excludes all other albums and might be useful during presentation to your customers or helping you go focus on your current project.

Tomorrow, I will move deeper into the use and organization of keywords.

04 November 2007

Improve your Workflow with Aperture - Part 1

Part 1 Optimize Libraries

Right out of the box, Aperture helps you to upload your images from your camera into the application fast . With a little bit of planning and preparation, you can make this one of the most effective ways to organize your images for the long run and have the images organized right from the beginning.

I love automating things and let the computer work for me and not vice versa. It takes some time to create the setup, but once you accomplished this, you will save time every time, you upload your images.

This is the first article in a small series on maximizing your workflow with Aperture.
  1. Optimize Libraries
  2. Optimize your folder structure
  3. Personalize and structure your Keyword List
  4. Create your own Metadata Presets
  5. Autostacking
Let's get started with organizing your library/ libraries.

First of all, you need to decide, if you work with only with one library or different libraries. Why would you want to work with more than one library? Earlier this year, I discovered that Aperture slowed down to an unacceptable slow speed. Concerned that my MacBook Pro would be the source of the problem, I visited my favorite Apple Store. Luckily, one of the sales people works on weekends as wedding photographer and understood my challenge. He pointed out to me that I probably don’t need to have access to my private images from 2005 all the time and recommended to create separate libraries for personal images and my professional work.
I applied his advice and created different libraries for my images. Now, I have one library for the current year with private images and for every quarter of the year a separate library for my professional work.

If your library is not that big and you don’t upload images every day this might not be necessary for you. Keep in mind that this strategy also helps for backing up your data. Let’s say, you have a library for your clients for January to March, you can simply back up the complete library on an external hard-drive without much worry.

Follow these steps to create a new empty library:

  1. If you haven’t done so, start Aperture, go to Preferences (Keyboard Shortcut: Command ,). Right on top, under Library Location, select Choose. Create a folder for your new empty Library on your internal or external hard-drive. Apple recommends for best performance to use your internal hard-drive. This depends on how you work. I work currently with referenced files. My Aperture library on my Mac contains the previews and all but the most current Master Files are saved on an external hard-drive.
  2. After you created your folder, click on Select
  3. Close Aperture
  4. When you navigate to your new library, you have the option to rename the library or keep them in different folders.
  5. Navigate to your new library and double click to start Aperture and your new empty Aperture library presents itself to you.

To open a different library, you have two options:
  1. either navigate to the folder where the library resides to start Aperture from there or
  2. you select a different library within Aperture’s Preferences. You need to restart Aperture in order to open this library.
Implementing this strategy helped me working more effectively with my library and sped up Aperture to it’s old speed. I don’t have to worry about showing private images to my clients by accident.

In the next article, you will learn on how to work with different folder structures in Aperture.

03 November 2007

Image: Seapoint Cape Town


A few weeks ago, my wife went for a walk in the afternoon along Seapoint and I was able to capture this image. BW conversion via Aperture.

Google Custom Search

I planned to do this for a while. Today, I finally got it done. On the top left side of this page, you find now two search boxes. One search box offers a search for this site only. You might remember that you saw something here that you want to read again. Enter your query and Google delivers.

The second search box extends the search to external photo related blogs, which I am currently subscribed to. Currently, 28 blogs are included, but this number will grow soon to give you the best possible resource on photo related queries.

If you have any suggestions for sites to be included, put them in as a comment.

02 November 2007

Slideshow

I found a link to flickrslidr on Strobist's blog. The slideshow setup was so easy and resulted in an appealing presentation. Check it out yourself.
The images, I selected are from a 5 day hike with friends along the Whale Trail in South Africa.


Created with
Admarket's flickrSLiDR.

30 October 2007

Rechargable batteries

A few weeks ago, David Hobby aka Strobist published a post about using rechargeable batteries for strobes. It was a pleasant surprise for me to find Energizer rechargeable batteries in Cape Town and even the local retailer Pickn' Pay stocks rechargeable batteries now.

I followed the advice to hit for batteries with at least 2500 mAh. I have been using the batteries for a couple of weeks now and am happy and don't see any reason, why I should buy normal batteries ever again.

To get the longest life span out of the batteries, I opted for a slow charger. First, I prepared myself for a complicated life and then experienced that it is much easier than expected. The batteries don't use their charge as quickly as I anticipated and though I charge on a regular basis, I don't have to do it as often as expected. As a precaution and for busy days, I bought a second set of batteries for my strobes and a second charger. Charger are almost thrown in for free in some special offers, so it's worth looking out for these offers.

So what about performance? I used to work with a 5 battery setup on my SB 800 strobes. Rechargeable batteries have a higher life expectancy when they are charged together. Most chargers allow 2 to 4 batteries to be charged at the same time. So, I gave it a try to work only with 4 batteries. Works great, without any noticeable loss in recycle time. So far the batteries worked fantastic. No problems whatsoever.

When the batteries of my wireless keyboard and mouse died, I replaced them with rechargeable batteries as well. My expectation was that I would have to recharge every week to keep things going. That was about 3 or 4 weeks ago. Our household is moving towards 100% use of rechargeable batteries. It is not cheap, talking from a South Africa perspective, but pays off long term.
It is the same story as with energy saving lamps. At the beginning you are hesitant to pay so much money (and it is not that much anymore) for them, but now it is second nature, if one of them actually breaks to go with the energy saving version. At least, I assume you do so as well.

Before I forget: My second charger connects also to my car, so if I am desperate, I can charge batteries on my way to a photo shoot...

29 October 2007

Working with Custom Settings on the Nikon D200

It took me a while to get accustomed to work with custom settings on the Nikon D200. I actually, didn't touch this option for almost year. What a mistake! Using custom settings, I can easily change a whole lot of setting for colour balance, image quality, autofocus etc by the changing to a different preset. If I want to do candid shots at a family gathering, I select my point and shoot setting with a bit more intense colour, using the built in flash for TTL exposure... If I want to take a serious portrait of a family member, I change to the custom setting for portraits with raw compression and activated CLS for more interested lighting with my SB 800s. The nice thing is that you can define up to 4 different custom setting setups.

To begin with, there are two custom setting menus, the first you find in the Shooting Menu, where you define on how to optimize the image, image quality, compression, ISO settings. In the Custom Settings Menu, you can set option for autofocus, metering, timeers, shooting display etc. Which means, you have to work with two different setups and need to change both, which still is much faster than changing the settings manually.

I found a nice version at Nikonians' webpage. They seem to have some server problems at the moment. Check them out later today or tomorrow. I hope they will be up and running again by then. Search their webpage for "Custom Settings v1-5". It is an Excel Spreadsheet, which offers you a great starting point.

I downloaded the spreadsheet a couple of weeks ago. I copied each and every setting in the two custom settings menus. Then, the fun started and I explored what works for me and what doesn't. Some settings are simply great and work fantastic for me and other simply are not, what I am after. The real nice thing about custom settings, is how is easy they are to setup and change.

You simply select the custom settings bank, you want to work with. Go into each and every menu and submenu and enter the changes you need. Not happy? Just change them again.
Be aware the next time you take pictures, which custom setting bank, you chose. You don't want to take your high profile portrait with your point and shoot settings! It takes a bit to get used to, but for me it is second nature. After each photo session, I set my camera back to my favourite custom setting bank.

Have a look at it and play around. It is a feature worth checking out further.

28 October 2007

Some interesting links

As part of my daily routine, I read a good amount of blogs (via Google Reader) every morning.
Here are some entries, I found interesting enough to share with you:

Inside Aperture shows you, on how to setup an online approval system with Aperture and some other software.

Pixelated Image gives some advice on self promotion.

David Hobby aka Strobist, shares an interview with 17 year old photographer Joey Lawrence. His work is outstanding and he is releasing teaching DVDs. Get some inspiration and read the interview and the go to his web-page.

Jasmine Star (what a name!) is a wedding photographer in the states, who's work inspires me working with available light. Her pictures look vibrant and fresh.

For any Apple fans, who haven't heard yet: Leopard has been released...

New Cameras and I am back

I haven't concentrated on my blog for the last few months, as you can see in the lack of blog entries. My photography business needed some focus and attention. Now I am back in situation, where I can spend more time writing again.

A lot of things happened. For Nikon fans, the new Nikon D3 was announced. It is the first full frame sensor Nikon digital camera. From the numerous reports, I read it appears to be a truly sweet piece of camera. There have been improvements in the autofocus system and most importantly in the quality of high ISO exposures. The published test images on Nikon's webpage look promising. Some of the nifty features are 9fps continuous shooting on full frame, scene recognition system for better exposures etc. Another interesting feature, I noticed is the artificial horizon (looks like from a aeroplane cockpit), which helps you keeping the camera in line with the horizon (important for architecture and landscape).

Together with the D3, the D300 (successor to the D200) had been announced. This camera promises some nice improvements as well. I will get into more detail on both cameras in a later entry.

Have a look at Nikon's page to find out more.

29 June 2007

Strobist 102 started

Strobist has started the Lighting 102 course. Why is it called 102, because the first one was called Lighting 101. Actually this week is already the second part and deals with distance. If you want to participate, you can still upload your assignment to Flickr. You can find more information on the Strobist Webpage. You might find this exercise less than exciting, but still do it. You learn by doing things more than just reading it. I did my assignment and encourage you to do the same.

David, the man behind Strobist just decided to take a leave of absence from work to concentrate for one year on the webpage and his family. As much as the strobist was worth the read and learning experience in the past, so much more is to be expected now.

That webpage is one of the best resources I know to learn about working with flashlights.

15 June 2007

New Nikon DSLR Rumor

If you want to spice up your life with some rumors after Apple's WWDC, there is a rumor out that Nikon is going to present a new Nikon DSLR camera. A journalist gave out the information. According to that, the camera would be better than anything that Canon released.

You can read more here. As I said, it is a rumor and might just be totally untrue, nice thought anyway. :-)

13 June 2007

Aperture Links

If you are working with an Apple Mac and enjoy working with Aperture, the following links might be interesting for you:

A reference point for a lot of information about Aperture is O'Reilly's Aperture Blog. You find most days at least two new entries tips, tricks and experiences around Aperture.

Related to O'Reilly's Aperture Blog is Aperture Plugged In with a presentation of plugins for Aperture. There are plugins for Flickr, istockphoto, Facebook etc. A lot of the plugins are for free, if you are using any of the related services. The webpage just received refreshed look, which makes it easier to navigate and find relevant information and there is so much more to explore. 

Another resource that I just found today via Aperture Plugged In, is Aperture Users Professional Network. This page appears to be resourceful as well. You need to sign up in order to be able to read some of the more in depth articles etc. There is a free membership (for which I opted, at least for now) and a paid membership. They organise course and tutorials, which you can attend as well.

If you have any other good links about Aperture, please let me know, so that I can upload them here.


04 June 2007

Bill Gates and Steve Jobs at D5 Interview transcript

Okay, computers again. I found this one today, a conversation between Bill Gates and Steve Jobs, organized by All Things Digital.


read more | digg story

You can also watch it here:


Enjoy, just make sure to have a good internet connection. You can also download an audio or video podcast here

Do you really still need a tripod?

Some time ago, I read on a webpage that digital cameras replaced tripods. Somewhere else I read that the quality of a photographer is measured by how often he/she uses a tripod. What do I think about these statements? Though both of them have truth in them, they are also incorrect.

Why? Similar to computer technology, you find people who promote their way as the only right way. Apple users might say that only Apple computers are real computers, while Windows users say that Apple computers are overpriced and only for designers and rich people. I prefer my Mac to any Windows PC, but also know that some applications are only available for Windows or vice versa. Will I sell my Mac for that reason? For sure not, but I also know, where I might experience disadvantages. Skype, for example develops their software faster for Windows users and I have to be patient to be on par with my wife and her computer in that area.

Let's have a look at the issue with the tripod. What is my experience? I do use my tripod less since I work with my digital SLRs (Nikon D200 and D70s). It is amazing how little light I require to create beautiful pictures without using a flash or tripod. I don't use my tripod for weddings or portraits in general. (The exception just proves the rule.) I am more flexible and can move faster. There is less to carry around. Even for a lot of my landscape photography, I don't take my tripod with me. Hiking up Lion's Head with a tripod would be quiet tough. I still get some great images out of that.

But...

there are occasions, where I want to concentrate on composition, work with long exposure or simply wait for a cloud to disappear out of the picture frame. In those moments I love my tripod and very often these are landscape shots. If I head for maximum sharpness, focus, depth of field, my tripod will be my companion. Or, if I work in my studio, I do very often use my tripod. It is so much more convenient, though I unmount it for portraits. I need the flexibility of moving around. The tripod might still serve a valuable service as secure spot to park my camera.

As so often, it is not about either or, but to know when to use the right piece of equipment. I love available light photography, but is it the answer to everything? No, not at all. Working with flashlight can create images, absolutely impossible with available light alone. Would I always use the flash? No, sometimes you can capture the right atmosphere with available light alone.

Believe me, I was a hardcore believer in only taking pictures in available light for a while. I learnt my lessons! There are also photographers, who's work mostly consists of pictures taken in available light. Herni Cartier Bresson is one of the many examples. I don't think that Ansel Adams took many pictures without tripod. Most of his camera were far too big to just hold in your hand.

There are some good exercises that you can assign yourself. Try for a week to take pictures only without a tripod. The next week, take pictures only with a tripod. Do the same for working with available light and flash light. Use only one focal length and change to another the next week. Your skill as photographer will grow as a result of this.

Strobist: Lighting 102: Introduction

Strobist: Lighting 102: Introduction


If you are interested in learning more about using flash photography creatively, check this one out. The strobist webpage is starting the 102 Lighting course. There will be assignments to complete, so you will be challenged.

I will be participating, will you?

02 June 2007

Video Interview with Steve Jobs

All Things Digital interviewed Steve Jobs, the CEO of Apple. As I am enthusiastic about Apple computers and other products. Steve Jobs does not very often offers interviews. This interview gives some extra information about the iPhone, Apple TV and some other. Steve Jobs announces that the iPhone will be ready for customers by the end of June, latest by the 30th...


01 June 2007

Google bought Feedburner

It seems, today is blog day. Google announced today that they bought Feedburner. Feedburner is a tool for RSS feeds, which is used by a big number of bloggers, including myself. With the purchase, Google, clearly makes a point of showing their industry in user created content.

I would hope that Google will develop a new level of sophistication in using RSS feeds in the future. It's a bit scary to see this development as Google gains more and more influence into what the web community is doing. Google just bought Tube a few weeks ago... what will be next? Is Google becoming the Microsoft of the internet or will do things differently for the benefit of everyone?

"Offical wording: Q. Will Google assume full operational control of FeedBurner, or will FeedBurner remain autonomous?

A. We are excited to have the FeedBurner team join the Google team. The FeedBurner website will remain operational as we continue to integrate their technologies with Google's tools." (quoted from Feedburner's page)

Read more about this at Google's official blog

and here on Feedburner's page


tags technorati :

David Pogue on Microsoft's Surface Computer

I found this article yesterday at David Pogue's blog. David Pogue writes for the New York Times in the Technology section. This article was an interesting read for me as an Apple user...

Have fun reading it.

David Pogue on Microsoft's Surface Computer


31 May 2007

Autofocus Details 1: Separate Focusing from the Shutter

The Nikon D200 and other models in the digital SLR range have more than the shutter button to activate the auto-focus. The normal and most popular way of focusing it pressing the shutter button halfway down and wait until the object is in focus. The half way down shutter button movement also starts the light metering electronics.

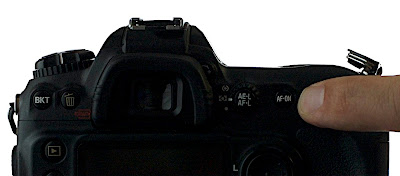
There might be occasions, where you want to separate these two steps. You might have focused on your object and just wait for the right moment to release the shutter without refocusing. You might have used the AF-ON button (1st image) on the back of your camera, probably by accident With the standard setup the shutter release button and AF-ON share the focusing. By splitting this functionality, AF-ON activates the auto-focus and the shutter release activates the light metering and obviously triggers the shutter.


Since I discovered this, I started using it for most of my photography. It is by far the fastest way of focusing, recomposing the image and take the photo with the preselected focus point.

So, how can you do it? Luckily, setting it up and resetting it, is easy.

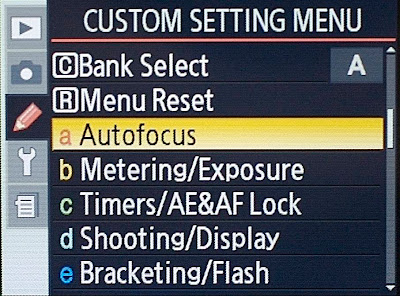
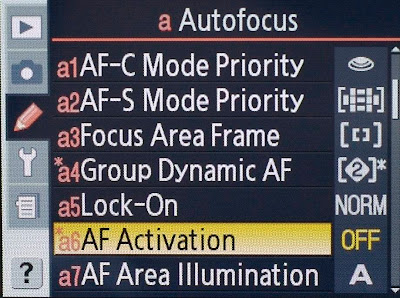
1) Select MENU at the back of you camera and select the submenu with the pencil symbol and choose Autofocus.


2) On the following screen select AF Activation.


3) Under AF Activation, you can either select Shutter/AF-ON or AF-ON only. With AF-ON only, you split focusing from the release button. To undo this, just select Shutter/AF-ON.


Give it a try and let me know of your experience.

tags technorati :

29 May 2007

Strobist: Sensor Cleaning Demo

Just a short entry for today. I found this video at the Strobist's Webpage. You can learn here, how to clean the sensor of your camera yourself. The editing of the video is rater rough or non exisitng. You still can learn a thing or two. Follow this link to the Strobist's webpage. Strobist: Sensor Cleaning Demo

Don't forget to have a look at the Lighting 101. You can learn a lot here. This blog is one of my favourite blogs about photography.

28 May 2007

How to use the White Balance Function for the Nikon D200

All modern digital SLR cameras come with a white balance automatic. The Nikon D200 is not exception. Using the automatic white balance works in most cases and is sort of accurate. If you want to hit the white balance right to the point, you need to work with the preset function of the D200.

In the slideshow you can see the difference settings and what effect they have on the picture. I worked with two different conditions. 1) Fluorescent light only 2) Fluoroscent light plus flashlight. The captions of the images display first the Camera setting followed by the light condition.


Using the preset gives you very good representation of the original light conditions.

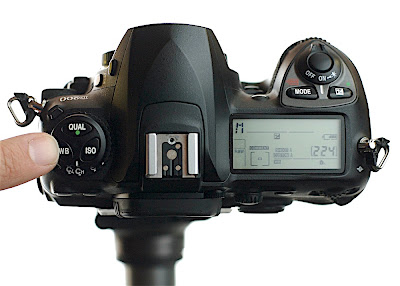
So, how do you change the different white balance settings? The engineers of the Nikon D200 made our lifes very easy with their design. On top of the camera on the left hand side, you find a button with three keys on: Qual (to select image quality), ISO (to set ISO manually) and WB (to select the white balance option). My finger is pointing to it in the first image. Holding the WB button and simultanously turning the backwheel, allows you to select a white balance setting. You see your current setting on the top display on the bottom line.


When you want to create your own individual preset, follow the these steps.

1) Get yourself a white sheet of paper.
2) Select the white balance option PRE
3) Hold the WB button on the camera top left for a few seconds until you can see PRE flashing in the top display.
4) Point your camera at the white sheet of paper. Make sure that you cover the whole image field. Don't worry about focus, but make sure the exposure is correct.
5) Press the shutter button.
6) If the camera is happy with the result, you will see the GOOD flashing, if that is not the case, do it again.

That is not too difficult, but there is one more thing. You can save your own presets and use them again in the future, without measuring the whitebalance again.
After step 2), you hold WB down for a short moment and turn the front wheel at the same time. On the top display next to your exposure mode, you see something like d-0 to d-4. These are your individual memory slots. Select one and proceed to step 3). The setting is saved for the memory slot, you selected.

I hope that helped and makes things a bit easier for you in the future.

26 May 2007

Google Calendar now mobile

This is a feature from Google calendar I was waiting for. Over the last year, I transferred my planning from my old fashioned calendar system to Google Calendar. I get my reminders sent to my cellphone via sms, receive confirmations of appointments... I can share my calendar with my wife or friends and can limit, what they can see. Google Calendar is linked to Gmail and emails with appointment requests are transferred automatically to the calendar. It is one of the things, I don't want to miss. What I was missing though, was solution for my cellphone, when I am out the office and want to make new appointments or check my availabilty for the next couple of days. Finally, Google produced a solution for my need.

If your mobile phone has the capacity to access the internet, you can log into your Google calendar by going to http://calendar.google.com. I got used to check my emails on the go and being able to check my calendar the same way is exciting. The capacities of the new feature are limited though. You can quick add new events, which is great, but you can't edit or delete current appointments. If you need a quick overview over your schedule for the next couple of days or enter quickly a new appointment into you calendar it is a useful tool. I assume that Google will upgrade the application in the future.

Check out the announcement from Google's blog.

Technorati Tags: , ,

25 May 2007

Books

One of the sources of inspiration for my photography from my teenage years onwards, were books on photography. There are some photographers, who's work impressed me and influenced me in the way that I look on photographs and on how I take pictures myself. I grew up in Germany, more exactly in Aachen a small town close to the Belgian and Dutch border. My hometown as small as it is had some moments of importance in the European history and sees itself today more as an European than a German city. Anyway, I grew up in this context and got exposed, especially in our local library to some books of great photographers.

One of the photographers, I got exposure to, was Henri Cartier-Bresson. He is the man, who coined the expression of the decisive moment, the moment where a photo starts telling a story. If you hit this moment in your photograph, you are close to a good picture. He himself avoided to be photographed as his work was well known. He did not want to be identified as Mr Cartier-Bresson, who takes these great pictures. Most of the time he worked with a Leica M camera with a 50mm lens attached. His skill was the compostion within that frame. The M camera allowed him to take pictures in situations, where a SLR camera would make the picture impossible altogether. Have a look at some of his work. It is worthwhile. One of the books, I received from some photo friends and one of my teachers is called in English: America in Passing. The book is currently out of print. If you find it a second hand book, it is a worthwhile investment into your learning. Here is a general link to some books by/ about, Henri Cartier-Bresson.


Alfred Eisenstaedt grew up in Germany in the beginning of the 20th century and immigrated to
as Jewish refugee to America. It is there that his career took off. He was one of the key photographers of Life Magazine and - I hope my memory serves me right here - was the photographer at Life with the largest number of title shots for Life Magazine. Probably, his most famous picture is the Kiss on Times Square on V.J. Day. Eisenstaedt presented himself as a very modest person and charmed with his humor. A lot of his images represent his skill to see the fun and joy between the lines. After watching a documentary about him (more than 15 years ago), I just loved his photography. Eisenstaedt on Eisenstaedt is one of my favourite books in my bookshelves.

Both photographers used as their main tool the Leica M system. The advantage of the system is the very small design and quiet operation paired with amazing interchangable lenses. It is a luxury, you have to pay for. Last year, Leica presented the first digital M camera after sticking to old concept for too long. Personally, I don't own a Leica M camera, though I wouldn't mind working with it. I like the concept and solid construction, but get far more versatility out of my current Nikon equipment, which I wouldn't call inferior. :-)

I will present some more photographers during the next few weeks.

Technorati Tags: , ,

24 May 2007

Just some interesting links

I just checked some interesting links in my Google Reader and want to share them with you. Not everything is photo related. Enjoy

If you have to give presenations, you might want to read this: Compulsive Obsession with Details will save your Neck

Have you ever wondered how the Magna Doodle works? We had a huge discussion about that with friends tonight. Here is the answer

This is a bit of an older one from Strobist's webpage. It might not be the easiest way of getting a white background. Sometimes you just have to do, what it takes to do that shot. Check it out here

Technorati Tags: , , ,

23 May 2007

How to setup the Nikon D200 or D70 for remote flash control

After I described the setup and shared some test results, I want to go a bit more into the detailed camera and flash settings that I used. The description might sound far more complicated than what it is. Actually it is extremely simple. There are just a few things to remember along the way.

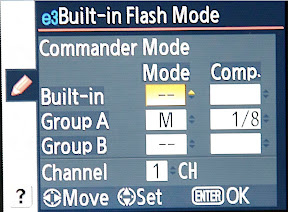
Let's move right into it. First, the description for the D200.

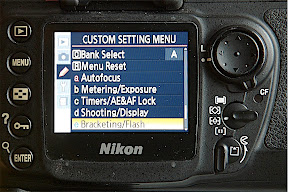
1) On the back of your camera select the Menu button
2) Select the Custom Setting Menu
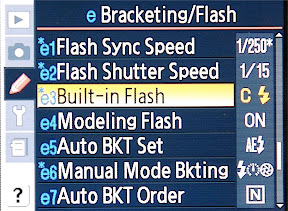
3) Select Bracketing/ Flash


4) Select Built-in Flash


5) Select Commander Mode


6) You are in Commander Mode


The built in flash operates now as commander for your external strobes (SB-600 or SB-800)
That is not too complicated. Just remember, when you are finished working with your external speedlights, to set the Built-in Flash Mode back to TTL.

For the D70 or D70s, you have to follow this route. For the D200 it is optional and sometimes the best way of doing it.

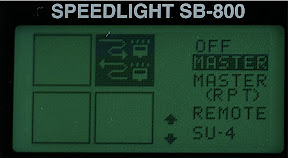
1) Put one of your speedlights (SB-600 or SB-800) into the hotshoe of your camera
2) Hold the SEL button pressed for a couple of seconds.

3) You should see the following selection, if not move up or down with the + or - button.


4) Click SEL again shortly and move via the + or - to MASTER
5) Hold the SEL button again pressed for a few seconds to confirm to get to the following screen


You are ready to work with your wireless flash setup.
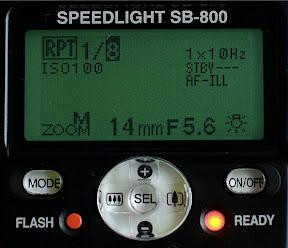
On your flash display, M refers to Master (Built-in on the D200)
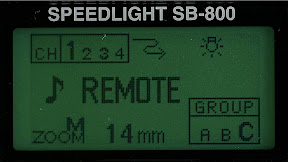
For both options, A and B refer to Flashlights that you define to group A or B. The display on the SB-800 gives you the option of a group C as well, This option is not available on the D200, if you work with the built in flash. Now, you need to set up your remote strobes in the same manner as in the setup of the flash as Master with one difference. You select REMOTE as option. The screen on the speedlight looks now like this:

By clicking SEL you can select either the Channel (1 to 3) or the Group (A to C). Within your selection you move via clicking + or -.

Now it is up to you. Select your sync time on your camera. I normally go for M or S. With the D200 you can go to at least 1/250 s to sync with your flash. Longer exposure times are of course possible. Experiment with the manual settings. The secret lies in the balance between exposure time and aperture. Try it yourself and document the results for your own notes.

If you have any questions or comments, feel free to leave a comment.

Technorati Tags: , ,

22 May 2007

Free Tony Robbins talk at TED conference

The yearly TED conference (T for Technology, E for Entertainment, D for Design) brings together on one weekend 50 of the best thinkers and inspiring public figures to give a talk of 18 minutes each. The event is all about sharing ideas and concepts. According to TED's website, the conference in Monterey, California is sold out 1 year (!) in advance. This talk is from Feb 2006. I found it interesting enough to link to it from this blog as I found it again today. This is one of these presentations which don't lose value by being 1 year old or older.
It is worth taking notes and apply the new knowledge. Enjoy it.


There are far more talks available on TED's web-page. You can not only watch them online, but also download them to your computer. Follow this link

Technorati Tags: , , ,

Nikon D200 and SB800 working the strobist way

As announced yesterday, I worked a bit more with my Nikon D200 and my SB800 strobes to work in a setup as used by the strobist. I allowed myself the freedom to use the built in wireless strobe control system, called CLS. David Hobby from the Strobist Blog uses Pocketwizards to trigger the flashlights. There are two reasons, why I didn't go this route at least for now.

  1. The Pocket Wizards are rather pricy, at least from a South African perspecitve and I want to keep the expenses low.
  2. A quick and not comprehensive websearch did not result in any import of the Pocket Wizards in South Africa.

I couldn't find any volunteers today to work with me as models, so I had to the experiments on myself. At least I warned you. I thought about the setup for a while and came to the conclusion that I want to try to balance the outside light with the strobes inside. So, my first step was to do a quick measurement of the outside light. I did that using the spotmeter in my camera, checking the exposure of the vehicle in front of the house. A quick test shot pleased my expectation and started working with the strobe.

I mounted it on a lightstand fitted with an umbrella. A combination, I would also use at a customer's site. In the past I would have relied on the built in TTL system and would have chosen a TTL +1 or similar for the flash exposure. Well, this time I went straight to manual operation of flash and camera. I selected the aperture/ time combination I measured earlier and did my first testshot with the flash with a guessed 1/4 of the strobe power. Life would have been great, if the first test would have been perfect. I played around a bit with the right relationship between aperture, time and flash intensity, until I got the balance of light, I was looking for. Finding this balance, did take only a few minutes, as I also played with the position of the flash to avoid reflections etc. In this photo, you can see the even distribution of light between the outside and inside. Is this always the most pleasing result, I would go for. Probably not, but this was not the aim of the experiment.


The next step was for me to put a person into the picture to work with foreground, middleground and background. Achieving a nice exposure went smooth and easy. Looking rather intelligent and getting the focus right not that much. That is rather a problem of self portraits...

To get my ego really going, I took another picture with changing the balance of the light and depth of field to give it a bit more tension and a feel of three dimensions.

Later one of my cats decided to get cozy on the couch and it was amazingly simple to adjust the light to the new setup. I reckon that is one of the big advantages of working this way. You have far more control over the design of the light and can change settings on the go according to the needs.

The last image illustrates the setup of flash, camera and cat.

My conclusion after these simple shots is: The technique is fast, simple and allows massive amount of control over the outcome. It is up to me to refine it and apply it to different situations.

Technorati Tags: , , ,

21 May 2007

Working with wireless flashes

My Nikon D200 is equipped with wireless flash control (Nikon calls it Creative Lighting System - CLS), which simply means that the built in flash can be set on commander control and with that can remotely trigger and adjust external system flashlights like the SB600 or SB800. Is it a great tool? For sure it is! You can use TTL mode, manual mode or A mode. With the built in setup, you can control two external flash groups (consisting of 1 or more flashlights each). If you use a SB800 or the controller unit SU800, you have the ability to work with 3 different flash groups. You can download this document from Nikon for more details of the setup.

Is there a downside to it? Yes, the flashlights need to be in visual contact to the control unit. Otherwise the infrared receivers cannot pick up the signal and won't trigger. In most setups that is easy to accomplish, though not always.

I have been using until recently mostly the TTL setup as it is easy to use. Most of the time I would get the result, I was after, but sometimes it seems the communication between me and my camera did not flow perfectly.

A while back, I found the the strobist webpage with some great advice about using flashlights in a wireless setup. Strobist is run by David Hobby, photographer for the Baltimore Sun. I used the articles as inspiration for flash setups, but continued to work with the TTL setup. This weekend I decided to explore David's advice to go manual. Honestly, I was a bit sceptical, but went for it anyway. David also uses radio triggers for his flashlights, which cancel out the problem of visual contact between controller and flash. As I didn't have those, I just went with what I had.

Man! I was surprised, on how easy it was just to go manual. For the first few shots, I used a flashmeter, but packed away quickly. It was not necessary. All the information, I need I saw on the little screen on the back of my camera after did the shot. I just adjusted the manual output of the lights according to what I saw. That made the process quick and easy. Actually, as easy, if not easier than using TTL. I had the feeling to gain 100% control over the process again. It was almost like standing in the darkroom and printing my own images. A great feeling.

The objects of my experiments weren't very sexy and I did not bother too much with composition. The technique was more important for me than anything else. I will post some images over the following days, where I will use the newly learnt techniques in an attractive context.

18 May 2007

New Feature from Picasaweb

Google added a new and very useful feature to Picasaweb. You can now create Flash slideshow on Picasaweb and include them in your blog or webpage.
5 different sizes of the slideshow are offered:
144 px, 288 px, 400px, 600px, 800px

Here is a 400 px of one of my portraitsessions:


For more info check Google's blog:
Official Google Blog: Oh, the places you'll go....

Just a snapshot from the airport

We brought my brother in law to the airport this week and I was able to do this quick snapshot as the sun just set. The airport is the international airport of Cape Town. One of the smaller international airports in the world.

17 May 2007

Focus

Recently I took some portraits of a couple in my family. We started the session with some standard shots, interesting, not too bad. The sun was setting, and I took the pictures against the light.
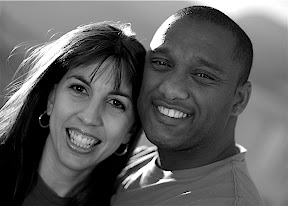
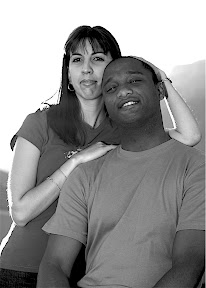
After we actually finished taking the pictures, the two became more playful and I just continued taking pictures. The result? A lot of images, quiet a few of them totally blurred as I worked with a slow shutter speed and no flash. Even though they are not 100% perfect in the sense of composition and focus, I prefer them to the standard shots. Have a look here:


Nice atmosphere and all, but this one is my favourite:

I enjoy the fun and interaction of the two most in this image.

14 May 2007

Apple Aperture

In my digital workflow, I use Apple's Aperture to import and organize my raw images. Working with Aperture is mostly intuitive and uncomplicated. Aperture allows me to create folder structures for my images in any possible way, which makes working so convenient for me.

Beside the powerful organization of my images, Aperture offers image correction as well. Most of the adjustments that I need to perform, I do right in the application. All adjustments are non invasive, meaning the original file is not touched. At any time it is possible to go back to the original file without loss of any information. These days, it is only on the rare occasion that an image needs some more in depth manipulation that I turn to Photoshop.

Adobe released it's own version with name Lightroom recently. I haven't worked with Lightroom yet myself, but it appears to be comparable and some users give it better ratings than Aperture.

You can find out more about Aperture at the folllowing links:

Apple
Inside Aperture

Let me know, about your experiences with any of the applications. Maybe you have some other interesting links, I can add.