In the slideshow you can see the difference settings and what effect they have on the picture. I worked with two different conditions. 1) Fluorescent light only 2) Fluoroscent light plus flashlight. The captions of the images display first the Camera setting followed by the light condition.
Using the preset gives you very good representation of the original light conditions.
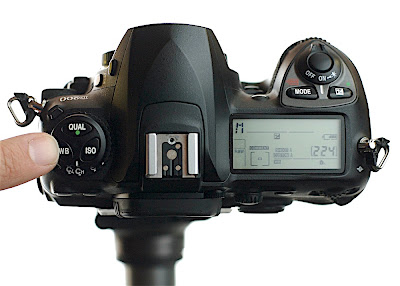
So, how do you change the different white balance settings? The engineers of the Nikon D200 made our lifes very easy with their design. On top of the camera on the left hand side, you find a button with three keys on: Qual (to select image quality), ISO (to set ISO manually) and WB (to select the white balance option). My finger is pointing to it in the first image. Holding the WB button and simultanously turning the backwheel, allows you to select a white balance setting. You see your current setting on the top display on the bottom line.

When you want to create your own individual preset, follow the these steps.
1) Get yourself a white sheet of paper.
2) Select the white balance option PRE
3) Hold the WB button on the camera top left for a few seconds until you can see PRE flashing in the top display.
4) Point your camera at the white sheet of paper. Make sure that you cover the whole image field. Don't worry about focus, but make sure the exposure is correct.
5) Press the shutter button.
6) If the camera is happy with the result, you will see the GOOD flashing, if that is not the case, do it again.
That is not too difficult, but there is one more thing. You can save your own presets and use them again in the future, without measuring the whitebalance again.
After step 2), you hold WB down for a short moment and turn the front wheel at the same time. On the top display next to your exposure mode, you see something like d-0 to d-4. These are your individual memory slots. Select one and proceed to step 3). The setting is saved for the memory slot, you selected.
I hope that helped and makes things a bit easier for you in the future.
No comments:
Post a Comment