A few weeks ago, David Hobby aka Strobist published a post about using rechargeable batteries for strobes. It was a pleasant surprise for me to find Energizer rechargeable batteries in Cape Town and even the local retailer Pickn' Pay stocks rechargeable batteries now.
I followed the advice to hit for batteries with at least 2500 mAh. I have been using the batteries for a couple of weeks now and am happy and don't see any reason, why I should buy normal batteries ever again.
To get the longest life span out of the batteries, I opted for a slow charger. First, I prepared myself for a complicated life and then experienced that it is much easier than expected. The batteries don't use their charge as quickly as I anticipated and though I charge on a regular basis, I don't have to do it as often as expected. As a precaution and for busy days, I bought a second set of batteries for my strobes and a second charger. Charger are almost thrown in for free in some special offers, so it's worth looking out for these offers.
So what about performance? I used to work with a 5 battery setup on my SB 800 strobes. Rechargeable batteries have a higher life expectancy when they are charged together. Most chargers allow 2 to 4 batteries to be charged at the same time. So, I gave it a try to work only with 4 batteries. Works great, without any noticeable loss in recycle time. So far the batteries worked fantastic. No problems whatsoever.
When the batteries of my wireless keyboard and mouse died, I replaced them with rechargeable batteries as well. My expectation was that I would have to recharge every week to keep things going. That was about 3 or 4 weeks ago. Our household is moving towards 100% use of rechargeable batteries. It is not cheap, talking from a South Africa perspective, but pays off long term.
It is the same story as with energy saving lamps. At the beginning you are hesitant to pay so much money (and it is not that much anymore) for them, but now it is second nature, if one of them actually breaks to go with the energy saving version. At least, I assume you do so as well.
Before I forget: My second charger connects also to my car, so if I am desperate, I can charge batteries on my way to a photo shoot...
Showing posts with label Nikon SB 800. Show all posts
Showing posts with label Nikon SB 800. Show all posts
30 October 2007
28 May 2007
How to use the White Balance Function for the Nikon D200
All modern digital SLR cameras come with a white balance automatic. The Nikon D200 is not exception. Using the automatic white balance works in most cases and is sort of accurate. If you want to hit the white balance right to the point, you need to work with the preset function of the D200.
In the slideshow you can see the difference settings and what effect they have on the picture. I worked with two different conditions. 1) Fluorescent light only 2) Fluoroscent light plus flashlight. The captions of the images display first the Camera setting followed by the light condition.
Using the preset gives you very good representation of the original light conditions.
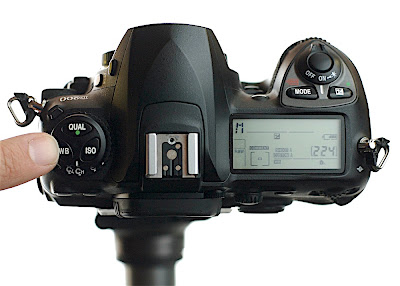
So, how do you change the different white balance settings? The engineers of the Nikon D200 made our lifes very easy with their design. On top of the camera on the left hand side, you find a button with three keys on: Qual (to select image quality), ISO (to set ISO manually) and WB (to select the white balance option). My finger is pointing to it in the first image. Holding the WB button and simultanously turning the backwheel, allows you to select a white balance setting. You see your current setting on the top display on the bottom line.

When you want to create your own individual preset, follow the these steps.
1) Get yourself a white sheet of paper.
2) Select the white balance option PRE
3) Hold the WB button on the camera top left for a few seconds until you can see PRE flashing in the top display.
4) Point your camera at the white sheet of paper. Make sure that you cover the whole image field. Don't worry about focus, but make sure the exposure is correct.
5) Press the shutter button.
6) If the camera is happy with the result, you will see the GOOD flashing, if that is not the case, do it again.
That is not too difficult, but there is one more thing. You can save your own presets and use them again in the future, without measuring the whitebalance again.
After step 2), you hold WB down for a short moment and turn the front wheel at the same time. On the top display next to your exposure mode, you see something like d-0 to d-4. These are your individual memory slots. Select one and proceed to step 3). The setting is saved for the memory slot, you selected.
I hope that helped and makes things a bit easier for you in the future.
In the slideshow you can see the difference settings and what effect they have on the picture. I worked with two different conditions. 1) Fluorescent light only 2) Fluoroscent light plus flashlight. The captions of the images display first the Camera setting followed by the light condition.
Using the preset gives you very good representation of the original light conditions.
So, how do you change the different white balance settings? The engineers of the Nikon D200 made our lifes very easy with their design. On top of the camera on the left hand side, you find a button with three keys on: Qual (to select image quality), ISO (to set ISO manually) and WB (to select the white balance option). My finger is pointing to it in the first image. Holding the WB button and simultanously turning the backwheel, allows you to select a white balance setting. You see your current setting on the top display on the bottom line.
When you want to create your own individual preset, follow the these steps.
1) Get yourself a white sheet of paper.
2) Select the white balance option PRE
3) Hold the WB button on the camera top left for a few seconds until you can see PRE flashing in the top display.
4) Point your camera at the white sheet of paper. Make sure that you cover the whole image field. Don't worry about focus, but make sure the exposure is correct.
5) Press the shutter button.
6) If the camera is happy with the result, you will see the GOOD flashing, if that is not the case, do it again.
That is not too difficult, but there is one more thing. You can save your own presets and use them again in the future, without measuring the whitebalance again.
After step 2), you hold WB down for a short moment and turn the front wheel at the same time. On the top display next to your exposure mode, you see something like d-0 to d-4. These are your individual memory slots. Select one and proceed to step 3). The setting is saved for the memory slot, you selected.
I hope that helped and makes things a bit easier for you in the future.
Subscribe to:
Posts (Atom)