24 May 2007

Just some interesting links

I just checked some interesting links in my Google Reader and want to share them with you. Not everything is photo related. Enjoy

If you have to give presenations, you might want to read this: Compulsive Obsession with Details will save your Neck

Have you ever wondered how the Magna Doodle works? We had a huge discussion about that with friends tonight. Here is the answer

This is a bit of an older one from Strobist's webpage. It might not be the easiest way of getting a white background. Sometimes you just have to do, what it takes to do that shot. Check it out here

Technorati Tags: , , ,

23 May 2007

How to setup the Nikon D200 or D70 for remote flash control

After I described the setup and shared some test results, I want to go a bit more into the detailed camera and flash settings that I used. The description might sound far more complicated than what it is. Actually it is extremely simple. There are just a few things to remember along the way.

Let's move right into it. First, the description for the D200.

1) On the back of your camera select the Menu button
2) Select the Custom Setting Menu
3) Select Bracketing/ Flash


4) Select Built-in Flash


5) Select Commander Mode


6) You are in Commander Mode


The built in flash operates now as commander for your external strobes (SB-600 or SB-800)
That is not too complicated. Just remember, when you are finished working with your external speedlights, to set the Built-in Flash Mode back to TTL.

For the D70 or D70s, you have to follow this route. For the D200 it is optional and sometimes the best way of doing it.

1) Put one of your speedlights (SB-600 or SB-800) into the hotshoe of your camera
2) Hold the SEL button pressed for a couple of seconds.

3) You should see the following selection, if not move up or down with the + or - button.


4) Click SEL again shortly and move via the + or - to MASTER
5) Hold the SEL button again pressed for a few seconds to confirm to get to the following screen


You are ready to work with your wireless flash setup.
On your flash display, M refers to Master (Built-in on the D200)
For both options, A and B refer to Flashlights that you define to group A or B. The display on the SB-800 gives you the option of a group C as well, This option is not available on the D200, if you work with the built in flash. Now, you need to set up your remote strobes in the same manner as in the setup of the flash as Master with one difference. You select REMOTE as option. The screen on the speedlight looks now like this:

By clicking SEL you can select either the Channel (1 to 3) or the Group (A to C). Within your selection you move via clicking + or -.

Now it is up to you. Select your sync time on your camera. I normally go for M or S. With the D200 you can go to at least 1/250 s to sync with your flash. Longer exposure times are of course possible. Experiment with the manual settings. The secret lies in the balance between exposure time and aperture. Try it yourself and document the results for your own notes.

If you have any questions or comments, feel free to leave a comment.

Technorati Tags: , ,

22 May 2007

Free Tony Robbins talk at TED conference

The yearly TED conference (T for Technology, E for Entertainment, D for Design) brings together on one weekend 50 of the best thinkers and inspiring public figures to give a talk of 18 minutes each. The event is all about sharing ideas and concepts. According to TED's website, the conference in Monterey, California is sold out 1 year (!) in advance. This talk is from Feb 2006. I found it interesting enough to link to it from this blog as I found it again today. This is one of these presentations which don't lose value by being 1 year old or older.
It is worth taking notes and apply the new knowledge. Enjoy it.


There are far more talks available on TED's web-page. You can not only watch them online, but also download them to your computer. Follow this link

Technorati Tags: , , ,

Nikon D200 and SB800 working the strobist way

As announced yesterday, I worked a bit more with my Nikon D200 and my SB800 strobes to work in a setup as used by the strobist. I allowed myself the freedom to use the built in wireless strobe control system, called CLS. David Hobby from the Strobist Blog uses Pocketwizards to trigger the flashlights. There are two reasons, why I didn't go this route at least for now.

  1. The Pocket Wizards are rather pricy, at least from a South African perspecitve and I want to keep the expenses low.
  2. A quick and not comprehensive websearch did not result in any import of the Pocket Wizards in South Africa.

I couldn't find any volunteers today to work with me as models, so I had to the experiments on myself. At least I warned you. I thought about the setup for a while and came to the conclusion that I want to try to balance the outside light with the strobes inside. So, my first step was to do a quick measurement of the outside light. I did that using the spotmeter in my camera, checking the exposure of the vehicle in front of the house. A quick test shot pleased my expectation and started working with the strobe.

I mounted it on a lightstand fitted with an umbrella. A combination, I would also use at a customer's site. In the past I would have relied on the built in TTL system and would have chosen a TTL +1 or similar for the flash exposure. Well, this time I went straight to manual operation of flash and camera. I selected the aperture/ time combination I measured earlier and did my first testshot with the flash with a guessed 1/4 of the strobe power. Life would have been great, if the first test would have been perfect. I played around a bit with the right relationship between aperture, time and flash intensity, until I got the balance of light, I was looking for. Finding this balance, did take only a few minutes, as I also played with the position of the flash to avoid reflections etc. In this photo, you can see the even distribution of light between the outside and inside. Is this always the most pleasing result, I would go for. Probably not, but this was not the aim of the experiment.


The next step was for me to put a person into the picture to work with foreground, middleground and background. Achieving a nice exposure went smooth and easy. Looking rather intelligent and getting the focus right not that much. That is rather a problem of self portraits...

To get my ego really going, I took another picture with changing the balance of the light and depth of field to give it a bit more tension and a feel of three dimensions.

Later one of my cats decided to get cozy on the couch and it was amazingly simple to adjust the light to the new setup. I reckon that is one of the big advantages of working this way. You have far more control over the design of the light and can change settings on the go according to the needs.

The last image illustrates the setup of flash, camera and cat.

My conclusion after these simple shots is: The technique is fast, simple and allows massive amount of control over the outcome. It is up to me to refine it and apply it to different situations.

Technorati Tags: , , ,

21 May 2007

Working with wireless flashes

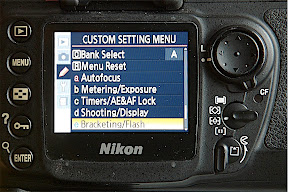
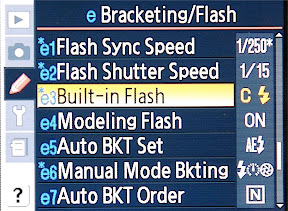
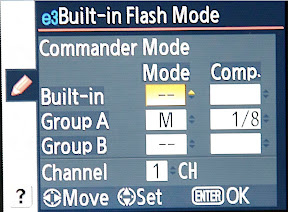
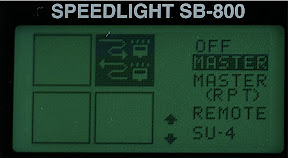
My Nikon D200 is equipped with wireless flash control (Nikon calls it Creative Lighting System - CLS), which simply means that the built in flash can be set on commander control and with that can remotely trigger and adjust external system flashlights like the SB600 or SB800. Is it a great tool? For sure it is! You can use TTL mode, manual mode or A mode. With the built in setup, you can control two external flash groups (consisting of 1 or more flashlights each). If you use a SB800 or the controller unit SU800, you have the ability to work with 3 different flash groups. You can download this document from Nikon for more details of the setup.

Is there a downside to it? Yes, the flashlights need to be in visual contact to the control unit. Otherwise the infrared receivers cannot pick up the signal and won't trigger. In most setups that is easy to accomplish, though not always.

I have been using until recently mostly the TTL setup as it is easy to use. Most of the time I would get the result, I was after, but sometimes it seems the communication between me and my camera did not flow perfectly.

A while back, I found the the strobist webpage with some great advice about using flashlights in a wireless setup. Strobist is run by David Hobby, photographer for the 
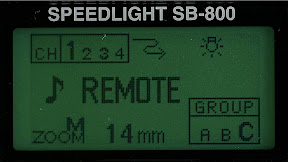
Baltimore Sun. I used the articles as inspiration for flash setups, but continued to work with the TTL setup. This weekend I decided to explore David's advice to go manual. Honestly, I was a bit sceptical, but went for it anyway. David also uses radio triggers for his flashlights, which cancel out the problem of visual contact between controller and flash. As I didn't have those, I just went with what I had.

Man! I was surprised, on how easy it was just to go manual. For the first few shots, I used a flashmeter, but packed away quickly. It was not necessary. All the information, I need I saw on the little screen on the back of my camera after did the shot. I just adjusted the manual output of the lights according to what I saw. That made the process quick and easy. Actually, as easy, if not easier than using TTL. I had the feeling to gain 100% control over the process again. It was almost like standing in the darkroom and printing my own images. A great feeling.

The objects of my experiments weren't very sexy and I did not bother too much with composition. The technique was more important for me than anything else. I will post some images over the following days, where I will use the newly learnt techniques in an attractive context.