Adjustments
Reading through my entries, I realized that you might want to see some more screenshots to illustrate my points and make things easier to understand. I will go through the posts over the weekend and upload some screenshots.
Remember that using the presented steps will help you becoming more effective with your import into Aperture for the long run, especially when you have to work with a lot of keywords. The initial setup can be time consuming, especially organizing the keywords.
I went through my keywords yesterday and started reorganizing them by exporting them into a text editor. This seems to work faster than working in Aperture directly. When you have a keyword more than once in your keyword list, make sure to select the correct keyword for the filter in the Smart Folder. Aperture appears to be stubborn, when it comes to that.
Some users prefer using Stacks in Aperture to organize and sort their images, others use the star rating system to stay organized. You need to see what works best for your circumstances and photo shoots. It is a theme, I will cover stacking and organizing images in Aperture soon.
Showing posts with label metadata. Show all posts
Showing posts with label metadata. Show all posts
08 November 2007


07 November 2007
Optimizing your Aperture Import Workflow - Part 4
This is the 4th part of a series of articles to improve your import workflow with Apple Aperture. After we achieved organizing libraries and created a library structure and successfully creating our personalized Metadata View, it’s time to have a closer look into keywords and adding one more detail to working with Metadata.
Aperture offers you a lot of flexibility in managing your own keywords. Aperture comes with some predefined keywords and keyword groups. It would be great if the predefined lists would be bigger, especially when you are working with stock libraries.
So, it takes a bit more of work from our side to get the results we need from Aperture. Aperture uses frequently HUDs (heads-up displays). These are semi-transparent pop up windows, which let you perform different tasks. As we are dealing today with keywords, let’s open the keyword HUD by using the keyboard shortcut Shift h. A more or less long list appears on your screen with keywords. You could just go ahead and add your own keywords. That can become messy. There is a better way.
Next to some keywords, you will notice a small triangle (1 in screenshot). Clicking on it, reveals subcategory keywords to the main keyword. These are keyword groups (2). You can also create subcategories of the subcategories, similar to the folder structures, we created on the second day of this series. Click (3) to create a new group or subcategory and (4) to add a new keyword.
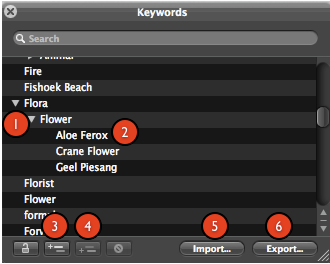
My first piece of advice for today is to keep your keywords organized. Create main categories and add related keywords to it. Also, create subcategories! It will make your life so much easier for the future!
Secondly, start each new keyword with a capital letter and thirdly check your spelling. You can correct spelling mistakes later, but keep things as organized and correct as possible right from the beginning.
You can check, if you prefer working in a text editor with your keywords, by exporting the keyword list (by clicking Export (5) on the bottom of the HUD) and opening it with your preferred text editor. For importing the newly edited list, you simply use the Import button (6).
When you work with a text editor, you create subcategories by using a tab as in this example:
Family
Outdoors
Indoors
Create some useful keywords for your workflow, import them into your keyword tool and close the keyword HUD.
There is another way of working with keywords and assigning keyboard shortcuts, but that is more useful, when working with already imported images. I will cover this in a blog entry at a later stage.
Click Ctrl D to open the Metadata View side-panel. Select your personalized Metadata View, you created yesterday. Now we get to the exciting part of the import preparations.
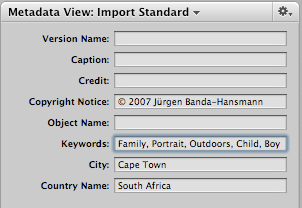
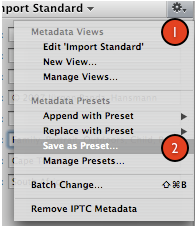
I do a lot of children and family photography and created an according keyword list. To make the whole thing work you need to select an image. Go to the Keywords field in your Metadata View (if you don’t have it, you need to add it as described yesterday.) You might see some keywords in there. Cut and paste them into a text editor. Enter the keywords for a Metadata Preset, you will use often. I enter: Family, Portrait, Outdoors, Child, Boy. In the field City, I enter Cape Town and for Country, South Africa. I also enter a copyright notice under Copyright Notice. (you can type the © sign by using alt g). Now I click on the star drop-down menu on the right hand side top and select: Save as Preset. Select a appropriate name and create as many presets as you want. After you finished, copy the original keywords back from the text editor to restore the image information.
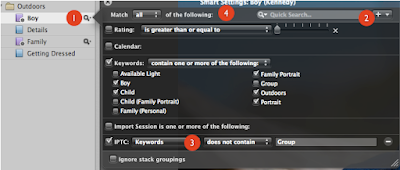
Now it is time to revisit your Smart Folders. Edit your smart folder by clicking on the loupe sign with the arrow (1 in the screenshot). If you haven’t done so, add Keywords as one selection category. (By using the drop down menu next to the + sign on the top right hand side of the HUD. (2) Click on IPTC. A new IPTC category is added. Just go to that drop down menu and choose Keywords. You can also use a second set of Keywords (3) for keywords you want to exclude.) You will see a list of keywords, which you simply select by clicking the box next to it. Use contain all of the following next to Keywords.(4)
If you have some images on your camera, you can go and import them now by connecting the camera or the card reader to your Mac. If you want to give it a test run, select some images for the import from your local hard drive, You can delete them afterwards.
Aperture opens the preview window with the image thumbnails. Let’s do some magic! Select some images, where you want to attach the same metadata from one of your presets. Go to the right hand side panel and go to Add Metadata From: "Your Metadata View Preset" and select Replace.
Repeat these steps until you did that for all your images with the corresponding presets. If you set up your smart albums correctly, they will be populated with the images you selected.
Optionally, you can choose to work with auto-stacking. To use this tool go to the bottom of the screen and move the slide from the left to the right until you see that your images are mostly grouped correctly. Moving the slider to the right increases the tolerance of the filter. If a few images are stacked together incorrectly, don’t worry about it now. Just extract them after the import from the stack and put them into the right stack manually.
Tomorrow, I will round up this series by covering some details and help you fine tuning the system. If you have any questions or you find that I was unclear in my explanation, please leave a comment and I will follow up.
Aperture offers you a lot of flexibility in managing your own keywords. Aperture comes with some predefined keywords and keyword groups. It would be great if the predefined lists would be bigger, especially when you are working with stock libraries.
So, it takes a bit more of work from our side to get the results we need from Aperture. Aperture uses frequently HUDs (heads-up displays). These are semi-transparent pop up windows, which let you perform different tasks. As we are dealing today with keywords, let’s open the keyword HUD by using the keyboard shortcut Shift h. A more or less long list appears on your screen with keywords. You could just go ahead and add your own keywords. That can become messy. There is a better way.
Next to some keywords, you will notice a small triangle (1 in screenshot). Clicking on it, reveals subcategory keywords to the main keyword. These are keyword groups (2). You can also create subcategories of the subcategories, similar to the folder structures, we created on the second day of this series. Click (3) to create a new group or subcategory and (4) to add a new keyword.

My first piece of advice for today is to keep your keywords organized. Create main categories and add related keywords to it. Also, create subcategories! It will make your life so much easier for the future!
Secondly, start each new keyword with a capital letter and thirdly check your spelling. You can correct spelling mistakes later, but keep things as organized and correct as possible right from the beginning.
You can check, if you prefer working in a text editor with your keywords, by exporting the keyword list (by clicking Export (5) on the bottom of the HUD) and opening it with your preferred text editor. For importing the newly edited list, you simply use the Import button (6).
When you work with a text editor, you create subcategories by using a tab as in this example:
Family
Outdoors
Indoors
Create some useful keywords for your workflow, import them into your keyword tool and close the keyword HUD.
There is another way of working with keywords and assigning keyboard shortcuts, but that is more useful, when working with already imported images. I will cover this in a blog entry at a later stage.
Click Ctrl D to open the Metadata View side-panel. Select your personalized Metadata View, you created yesterday. Now we get to the exciting part of the import preparations.

I do a lot of children and family photography and created an according keyword list. To make the whole thing work you need to select an image. Go to the Keywords field in your Metadata View (if you don’t have it, you need to add it as described yesterday.) You might see some keywords in there. Cut and paste them into a text editor. Enter the keywords for a Metadata Preset, you will use often. I enter: Family, Portrait, Outdoors, Child, Boy. In the field City, I enter Cape Town and for Country, South Africa. I also enter a copyright notice under Copyright Notice. (you can type the © sign by using alt g). Now I click on the star drop-down menu on the right hand side top and select: Save as Preset. Select a appropriate name and create as many presets as you want. After you finished, copy the original keywords back from the text editor to restore the image information.

Now it is time to revisit your Smart Folders. Edit your smart folder by clicking on the loupe sign with the arrow (1 in the screenshot). If you haven’t done so, add Keywords as one selection category. (By using the drop down menu next to the + sign on the top right hand side of the HUD. (2) Click on IPTC. A new IPTC category is added. Just go to that drop down menu and choose Keywords. You can also use a second set of Keywords (3) for keywords you want to exclude.) You will see a list of keywords, which you simply select by clicking the box next to it. Use contain all of the following next to Keywords.(4)

If you have some images on your camera, you can go and import them now by connecting the camera or the card reader to your Mac. If you want to give it a test run, select some images for the import from your local hard drive, You can delete them afterwards.
Aperture opens the preview window with the image thumbnails. Let’s do some magic! Select some images, where you want to attach the same metadata from one of your presets. Go to the right hand side panel and go to Add Metadata From: "Your Metadata View Preset" and select Replace.
Repeat these steps until you did that for all your images with the corresponding presets. If you set up your smart albums correctly, they will be populated with the images you selected.
Optionally, you can choose to work with auto-stacking. To use this tool go to the bottom of the screen and move the slide from the left to the right until you see that your images are mostly grouped correctly. Moving the slider to the right increases the tolerance of the filter. If a few images are stacked together incorrectly, don’t worry about it now. Just extract them after the import from the stack and put them into the right stack manually.
Tomorrow, I will round up this series by covering some details and help you fine tuning the system. If you have any questions or you find that I was unclear in my explanation, please leave a comment and I will follow up.
06 November 2007
Improve your Workflow with Aperture Part 3
Part 3 - Create your own Metadata Views
This is the 3rd part of a series of articles to improve your import workflow with Apple Aperture. After we achieved organizing libraries and created a library structure, we need to optimize our metadata tools. Getting the use of metadata right, will not only improve your import workflow, but will also assist you in the future with finding specific images in Aperture.
Metadata, allows you to attach information to your images, like time and date of capture, copyright, keywords etc. Some information is automatically attached to your image by your camera (exposure time, time and date of exposure etc.). You can other data manually. Adding keywords to thousands of images manually would be a harsh punishment and contradict what I believe in. Luckily, you can add the same metadata to more than one image at a time with Aperture and you can also automate the process to a certain extent. Creating your own metadata view is the first step.
Automation works great when you have to add the same kind of metadata to your images again and again. If you want to assign a copyright notice to all your images, you can work with metadata presets in Aperture. Once more, you have to work hard in preparing the presets, but the rewards are so sweet that you will actually enjoy the process.
Think about what kind of images, you work with on a regular basis: Are you mostly shooting weddings, portraits, cars, landscape or children? Whichever field you work in, adjusting your metadata to your needs will reward you with an import workflow which makes you so much more efficient and allows you to do the things you rather would be doing, like installing Leopard on your Mac. :)
In case you want to learn more about metadata, Wikipedia offers some interesting articles:
Metadata
EXIF
IPTC
These articles will supply with far more information that you need to work with Aperture.
It’s time to get to work. Open Aperture, go into any of your projects or albums and select a random image. Ctrl D will open the Metadata side-panel.
On top you see a drop-down menu called Metadata View. Select All IPTC. Your side-panel extends to a very long list of empty fields. If you choose EXIF - Expanded, you see a list with camera related data.
Go through the metadata views and look for a view your really like. Keep in mind that changing the view does not change the data assigned to the images. A view just filters what you see. Make a note of your favorite view. You will need it in the next step.
Let’s create our own view. Next to the Metadata View drop-down menu, you find a star with another drop-down menu. Click on it and select Manage Views. Yes, there is an option for New View, but that would build a view from scratch. We want to save on our workload... After opening Manage Views, you see a list of all existing Metadata Views. Select your favorite. I selected IPTC - Basic. Then click on the + sign on the bottom of the screen. A copy of your selected view is created. Give it an easy to remember name. I called mine Import Standard. Click OK. Now select your freshly created metadata view in the Metadata View drop-down menu. To add an extra field to your view, go to the bottom of the side-panel and select IPTC. A new list from the bottom up appears. Make sure to unselect Hide Empty Tags on top of that list.
Adding a new field to your custom view is as easy as ticking the box next the field name. In my case, I decided to select City and Country Name.
Your Metadata View is automatically saved. You don’t need to do anything else. Congratulations, you just created your first personalized Metadata View.
Tomorrow, we will create our own presets after creating some personalized keyword settings.
That's, where things become interesting and we will be ready to import our first project.
Yesterday, I got a bit carried away and announced writing about keyword settings for today’s entry. Please forgive me for that.
This is the 3rd part of a series of articles to improve your import workflow with Apple Aperture. After we achieved organizing libraries and created a library structure, we need to optimize our metadata tools. Getting the use of metadata right, will not only improve your import workflow, but will also assist you in the future with finding specific images in Aperture.
Metadata, allows you to attach information to your images, like time and date of capture, copyright, keywords etc. Some information is automatically attached to your image by your camera (exposure time, time and date of exposure etc.). You can other data manually. Adding keywords to thousands of images manually would be a harsh punishment and contradict what I believe in. Luckily, you can add the same metadata to more than one image at a time with Aperture and you can also automate the process to a certain extent. Creating your own metadata view is the first step.
Automation works great when you have to add the same kind of metadata to your images again and again. If you want to assign a copyright notice to all your images, you can work with metadata presets in Aperture. Once more, you have to work hard in preparing the presets, but the rewards are so sweet that you will actually enjoy the process.
Think about what kind of images, you work with on a regular basis: Are you mostly shooting weddings, portraits, cars, landscape or children? Whichever field you work in, adjusting your metadata to your needs will reward you with an import workflow which makes you so much more efficient and allows you to do the things you rather would be doing, like installing Leopard on your Mac. :)
In case you want to learn more about metadata, Wikipedia offers some interesting articles:
Metadata
EXIF
IPTC
These articles will supply with far more information that you need to work with Aperture.
It’s time to get to work. Open Aperture, go into any of your projects or albums and select a random image. Ctrl D will open the Metadata side-panel.
On top you see a drop-down menu called Metadata View. Select All IPTC. Your side-panel extends to a very long list of empty fields. If you choose EXIF - Expanded, you see a list with camera related data.
Go through the metadata views and look for a view your really like. Keep in mind that changing the view does not change the data assigned to the images. A view just filters what you see. Make a note of your favorite view. You will need it in the next step.
Let’s create our own view. Next to the Metadata View drop-down menu, you find a star with another drop-down menu. Click on it and select Manage Views. Yes, there is an option for New View, but that would build a view from scratch. We want to save on our workload... After opening Manage Views, you see a list of all existing Metadata Views. Select your favorite. I selected IPTC - Basic. Then click on the + sign on the bottom of the screen. A copy of your selected view is created. Give it an easy to remember name. I called mine Import Standard. Click OK. Now select your freshly created metadata view in the Metadata View drop-down menu. To add an extra field to your view, go to the bottom of the side-panel and select IPTC. A new list from the bottom up appears. Make sure to unselect Hide Empty Tags on top of that list.
Adding a new field to your custom view is as easy as ticking the box next the field name. In my case, I decided to select City and Country Name.
Your Metadata View is automatically saved. You don’t need to do anything else. Congratulations, you just created your first personalized Metadata View.
Tomorrow, we will create our own presets after creating some personalized keyword settings.
That's, where things become interesting and we will be ready to import our first project.
Yesterday, I got a bit carried away and announced writing about keyword settings for today’s entry. Please forgive me for that.
Subscribe to:
Posts (Atom)