31 May 2007

Autofocus Details 1: Separate Focusing from the Shutter

The Nikon D200 and other models in the digital SLR range have more than the shutter button to activate the auto-focus. The normal and most popular way of focusing it pressing the shutter button halfway down and wait until the object is in focus. The half way down shutter button movement also starts the light metering electronics.

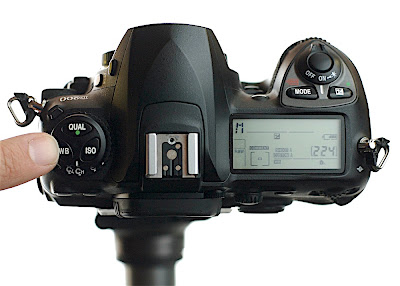
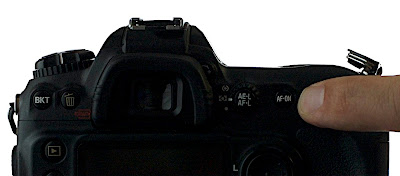
There might be occasions, where you want to separate these two steps. You might have focused on your object and just wait for the right moment to release the shutter without refocusing. You might have used the AF-ON button (1st image) on the back of your camera, probably by accident With the standard setup the shutter release button and AF-ON share the focusing. By splitting this functionality, AF-ON activates the auto-focus and the shutter release activates the light metering and obviously triggers the shutter.


Since I discovered this, I started using it for most of my photography. It is by far the fastest way of focusing, recomposing the image and take the photo with the preselected focus point.

So, how can you do it? Luckily, setting it up and resetting it, is easy.

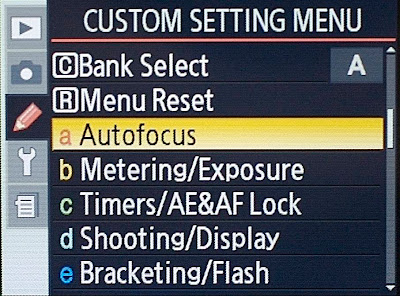
1) Select MENU at the back of you camera and select the submenu with the pencil symbol and choose Autofocus.


2) On the following screen select AF Activation.


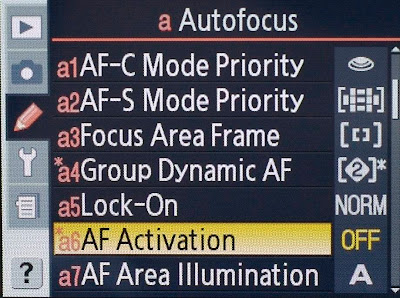
3) Under AF Activation, you can either select Shutter/AF-ON or AF-ON only. With AF-ON only, you split focusing from the release button. To undo this, just select Shutter/AF-ON.


Give it a try and let me know of your experience.

tags technorati :

29 May 2007

Strobist: Sensor Cleaning Demo

Just a short entry for today. I found this video at the Strobist's Webpage. You can learn here, how to clean the sensor of your camera yourself. The editing of the video is rater rough or non exisitng. You still can learn a thing or two. Follow this link to the Strobist's webpage. Strobist: Sensor Cleaning Demo

Don't forget to have a look at the Lighting 101. You can learn a lot here. This blog is one of my favourite blogs about photography.

28 May 2007

How to use the White Balance Function for the Nikon D200

All modern digital SLR cameras come with a white balance automatic. The Nikon D200 is not exception. Using the automatic white balance works in most cases and is sort of accurate. If you want to hit the white balance right to the point, you need to work with the preset function of the D200.

In the slideshow you can see the difference settings and what effect they have on the picture. I worked with two different conditions. 1) Fluorescent light only 2) Fluoroscent light plus flashlight. The captions of the images display first the Camera setting followed by the light condition.


Using the preset gives you very good representation of the original light conditions.

So, how do you change the different white balance settings? The engineers of the Nikon D200 made our lifes very easy with their design. On top of the camera on the left hand side, you find a button with three keys on: Qual (to select image quality), ISO (to set ISO manually) and WB (to select the white balance option). My finger is pointing to it in the first image. Holding the WB button and simultanously turning the backwheel, allows you to select a white balance setting. You see your current setting on the top display on the bottom line.


When you want to create your own individual preset, follow the these steps.

1) Get yourself a white sheet of paper.
2) Select the white balance option PRE
3) Hold the WB button on the camera top left for a few seconds until you can see PRE flashing in the top display.
4) Point your camera at the white sheet of paper. Make sure that you cover the whole image field. Don't worry about focus, but make sure the exposure is correct.
5) Press the shutter button.
6) If the camera is happy with the result, you will see the GOOD flashing, if that is not the case, do it again.

That is not too difficult, but there is one more thing. You can save your own presets and use them again in the future, without measuring the whitebalance again.
After step 2), you hold WB down for a short moment and turn the front wheel at the same time. On the top display next to your exposure mode, you see something like d-0 to d-4. These are your individual memory slots. Select one and proceed to step 3). The setting is saved for the memory slot, you selected.

I hope that helped and makes things a bit easier for you in the future.

26 May 2007

Google Calendar now mobile

This is a feature from Google calendar I was waiting for. Over the last year, I transferred my planning from my old fashioned calendar system to Google Calendar. I get my reminders sent to my cellphone via sms, receive confirmations of appointments... I can share my calendar with my wife or friends and can limit, what they can see. Google Calendar is linked to Gmail and emails with appointment requests are transferred automatically to the calendar. It is one of the things, I don't want to miss. What I was missing though, was solution for my cellphone, when I am out the office and want to make new appointments or check my availabilty for the next couple of days. Finally, Google produced a solution for my need.

If your mobile phone has the capacity to access the internet, you can log into your Google calendar by going to http://calendar.google.com. I got used to check my emails on the go and being able to check my calendar the same way is exciting. The capacities of the new feature are limited though. You can quick add new events, which is great, but you can't edit or delete current appointments. If you need a quick overview over your schedule for the next couple of days or enter quickly a new appointment into you calendar it is a useful tool. I assume that Google will upgrade the application in the future.


Check out the announcement from Google's blog.

Technorati Tags: , ,

25 May 2007

Books

One of the sources of inspiration for my photography from my teenage years onwards, were books on photography. There are some photographers, who's work impressed me and influenced me in the way that I look on photographs and on how I take pictures myself. I grew up in Germany, more exactly in Aachen a small town close to the Belgian and Dutch border. My hometown as small as it is had some moments of importance in the European history and sees itself today more as an European than a German city. Anyway, I grew up in this context and got exposed, especially in our local library to some books of great photographers.

One of the photographers, I got exposure to, was Henri Cartier-Bresson. He is the man, who coined the expression of the decisive moment, the moment where a photo starts telling a story. If you hit this moment in your photograph, you are close to a good picture. He himself avoided to be photographed as his work was well known. He did not want to be identified as Mr Cartier-Bresson, who takes these great pictures. Most of the time he worked with a Leica M camera with a 50mm lens attached. His skill was the compostion within that frame. The M camera allowed him to take pictures in situations, where a SLR camera would make the picture impossible altogether. Have a look at some of his work. It is worthwhile. One of the books, I received from some photo friends and one of my teachers is called in English: America in Passing. The book is currently out of print. If you find it a second hand book, it is a worthwhile investment into your learning. Here is a general link to some books by/ about, Henri Cartier-Bresson.


Alfred Eisenstaedt grew up in Germany in the beginning of the 20th century and immigrated to
as Jewish refugee to America. It is there that his career took off. He was one of the key photographers of Life Magazine and - I hope my memory serves me right here - was the photographer at Life with the largest number of title shots for Life Magazine. Probably, his most famous picture is the Kiss on Times Square on V.J. Day. Eisenstaedt presented himself as a very modest person and charmed with his humor. A lot of his images represent his skill to see the fun and joy between the lines. After watching a documentary about him (more than 15 years ago), I just loved his photography. Eisenstaedt on Eisenstaedt is one of my favourite books in my bookshelves.

Both photographers used as their main tool the Leica M system. The advantage of the system is the very small design and quiet operation paired with amazing interchangable lenses. It is a luxury, you have to pay for. Last year, Leica presented the first digital M camera after sticking to old concept for too long. Personally, I don't own a Leica M camera, though I wouldn't mind working with it. I like the concept and solid construction, but get far more versatility out of my current Nikon equipment, which I wouldn't call inferior. :-)

I will present some more photographers during the next few weeks.

Technorati Tags: , ,